How to Backup Computer Windows 10?
A complete backup helps you safeguard your Windows 10 setup and important documents. This guide will provide you with the instructions to complete this task with ease.
Backing up your computer windows 10 isn’t optional but a necessity.
The process starts by clicking on the “start” button on your Windows 10 system, navigating to the “setting” page, then to the “update & security” section, clicking on “backup,” and choosing an option.
This might look simple here. But, you may get befogged as there will be multiple options to backup your Windows 10.
So, it requires an in-depth explanation and step-by-step processes to start with. Let’s dive in,
The Step-by-step Guide To Different Backup Solutions:
A full backup should always be your priority since it’s an effective strategy against hardware failures, malware attacks, apps, and upgrade problems. These may damage the entire installation setup of windows 10.
If you’re not creating backups, you’re simply putting all your documents, data, priceless pictures, and configurations at risk.
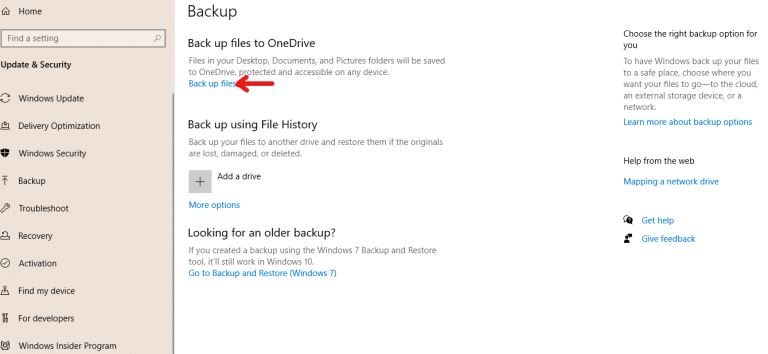
So, the multiple options for backing up your Windows 10 will pop up as you follow these steps- pressing the “start” button> clicking on “setting”> navigating to “Update & security”> and clicking “backup”-
You will see there are three options to backup your computer. We will discuss each of the backup solutions in a stepwise process.
-
Cloud-based Backup Solution
The world is driven by the enhanced mobility, security, and convenience of cloud storage. Cloud-based backup works the best for storing your data. Your content will be in a safe place, and you can easily access it.
This offers multiple benefits along with high-end security. First of all, you don’t need to purchase any hardware for a cloud-based backup solution. Secondly, you can access your files and images across multiple devices.
Also, the recovery process is simple and instant. All you will need is a cloud-based storage location and internet access.
For Windows 10 backup, Microsoft has its flagship cloud storage provider, OneDrive.
Quick note: Microsoft accounts get free 5GB cloud storage. It’s integrated with your file explorer. So, it’s an easy way to move on with syncing files between your pc storage and cloud storage. If you need more storage, you can buy an office 365 bundle with 1 Tb of one drive storage.
So, to start backing up your files with OneDrive, you have to follow the steps,
1. Click “start”>OneDrive> open> sign in> finish setting up
2. Now, visit the backup page from setting>update & security> backup. And click the “backup files'' under the backup files to the OneDrive section.
3. Now, select the documents, files, pictures that you want to backup, drag them down, and drop them under the OneDrive folder.
4. Now, after completing dropping the files to OneDrive, select the “start backup” option to complete your backup.
Note: If you use more than one account, all your personal files will appear under OneDrive (personal), and other files will appear under OneDrive(company name). And, for Mac, it will appear under OneDrive in a mac finder.
-
Backup Using File History
Backup using file history can be classified into two steps processes; external hard drive or network drive backups.
In this case, you will need an external storage device or network drive to backup your files and images. This solution is best to use if the internet isn’t available in a location or if you need to store large files.
You can schedule automatic backups to a network drive or external hard drive using this process. But, these files will take some time to upload. And, you may need to purchase more storage to store more files.
External Hard Drive Backup:
So, let’s start backing up your windows 10 with an external hard drive backup solution. To conduct this process, you will need a portable hard drive, a cord of which will be connected from the hard drive to one of your USB ports.
Once your drive is plugged in, windows immediately recognize your drive. Now, follow these step-by-step process for an automatic backup,
1. Open your control panel.
2. Click on the “file history.”
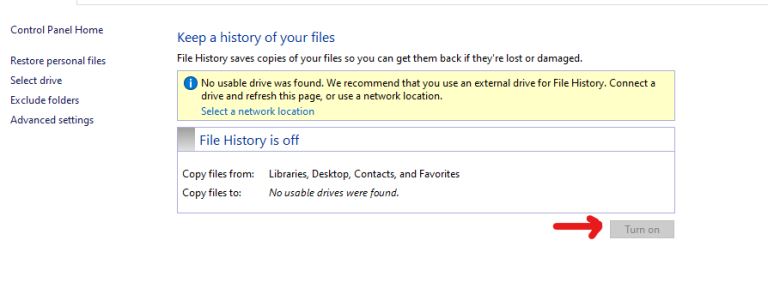
The file history section will take you back to the screen showing something similar to this,
3. Now click “turn on” to automatically start the backup process.
4. If you want to switch the drive location where you want to save your files as a backup, you can click on the “select drive" and process your request.
Network Drive Backup:
Windows 10 includes fairly advanced backup features that allow users to backup their system using the network drive. It doesn’t require you to buy an external hard drive.
In this case, the drive should be connected to a network server that you have access to. Network backups work great as it takes minimal effort to maintain the drive. There’s no need to plug in an external drive every time.
Plus, network drives are a more reliable option for backing up your important data. It’s cheaper than cloud storage yet offers almost the same perks.
All you will need is a networked storage space to back up your files. Now, follow the step by step process mentioned below,
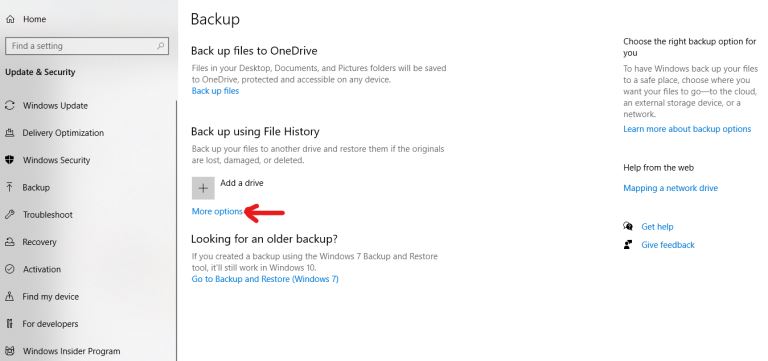
1. Select windows or start button>setting> update & security> backup> choose the “more options” under the back up using file history section.
2. Now click on “see advanced settings.” You will be directed to the control panel page.
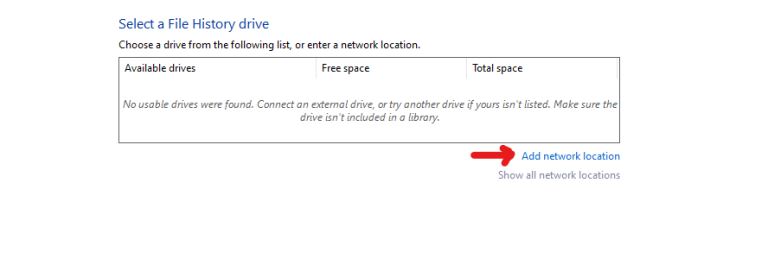
3. Click on “select drive”> add a network
4. Now click on “select folder” where you want to back up your files. You will be directed to select a file history drive screen, and you will see the network drive where you want to back up your files is listed.
5. Now click “ok.”
6. You will be routed back to the “keep a history of your files” page. Now click “turn on” to automatically back up your computer.
Note: you can change the default setting of how you want the system to backup your files and how long you want to keep the saved files from the “advanced setting” option. This will appear on your left as you navigate the “keep a history of your files page.”
-
Back up Using Windows 7 Backup & Restore Tool
The third approach to backup your files is to use the system image tool on windows 10 to create a full backup.
A brief idea about a system image contains a copy of your files, apps, installation setups, and settings on your computer. It’s a prudent approach to restore your system instantly.
Now, follow the process to create a backup using this process,
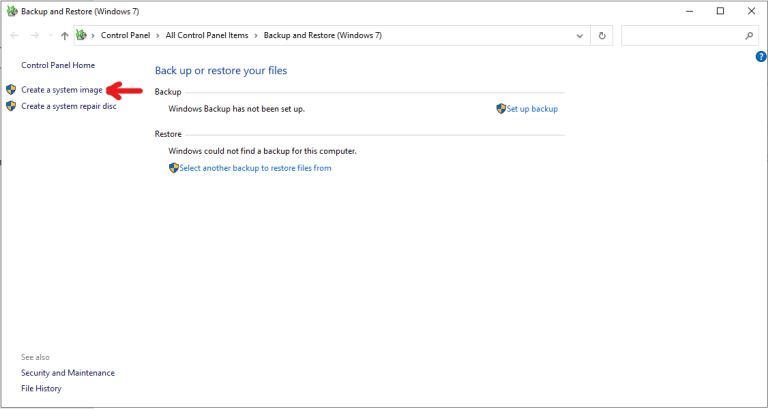
1. Click windows button> Setting>update & security> backup> click “go-to backup & restore" under the “looking for an older backup” section> create system image
It will show a dropdown menu like this,
2. From this drop-down menu, you can select the preferred location and click “next.”
3. Now click on “start backup” to enable your system to automatically backup your files.
This tool automatically creates the image of your entire system. It also includes the primary hard drive and other drives that you selected.
Note: You will also receive a prompt to create the system repair disc. But, you can skip it because most of the devices no longer include optical drives.
Conclusion
You never know when a hard drive failure will occur, and all your critical data will be accidentally deleted. Also, if malware infects your machine and you need to format, then backed up files and documents provide you peace of mind.
After all, You don’t want to lose your precious data. So, even if it consumes some time and feels cumbersome, there are no excuses not to backup your data.
Windows 10 built-in backup tools are enough to backup all your important files. In addition, it keeps your file in a safe and secure place.
Even if you lose your data or move to a different system, you can retrieve your documents easily with any of these above-mentioned steps.
