How to Change your Wi-Fi Password
Here, you will learn how to access your router's web interface and change your Wi-Fi Password in a few, simple steps!
Abstract: Log into your router's web interface using your IP address in the address bar of your preferred browser. Once inside, access the "wireless" tab (or a tab of a similar name) and navigate the options to locate the Wi-Fi settings. Once there, you will be able to change your Wi-Fi password and even the name of your network.
The time always comes when we grow tired of our current Wi-Fi password, probably since it hasn't been changed since the guys who installed your internet set it up, and you're left with a long, confusing password. Or it could be because your pesky neighbors got their hands on your password during game night, and you suspect they're still leeching off your access to the internet. Whatever the reason may be, you find yourself in need of changing the Wi-Fi password, but you can't figure it out for the life of you! Don't worry; changing your Wi-Fi password is a piece of cake!
So, how do you change your Wi-Fi password? Let's jump right in!
NOTE: Once done with this process, you will find that all devices previously connected to the internet have been disconnected from it. You will need to reconnect them once finished with the process of changing your Wi-Fi password.
Step 1: Obtain the IP address of your router
What is a router, you ask? A router is a box-like device with the many LED lights provided to you when your internet was set up. Each of these routers has a unique code of access to connect you to the internet, called the internet protocol address or the IP address.
You can find your IP address through a few simple steps:
For Windows users:
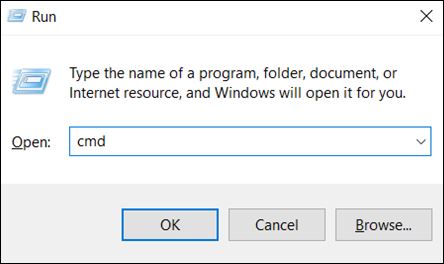
- First, open the command prompt. To do this, press Windows+R and type “cmd” into the window that just popped up. Then, press Enter to continue.
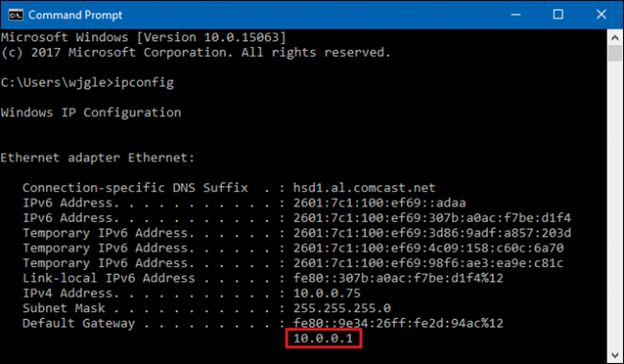
- You will find that the command prompt has opened up. Here, type in the command “ipconfig” and press Enter. An entire list of information about your internet connection will be displayed. This will look something like the following image:
- At the very end of this list, you will see a label titled “default gateway,” and your IP address will be displayed right next to it.
For macOS users:
- Click on the Apple menu. Once inside, locate “system preferences” and click on it.
- Once in this window, press on the “network” icon.
- There, select your “Wi-Fi or wired ethernet connection.” Once in this new window, press on the “advanced” option.
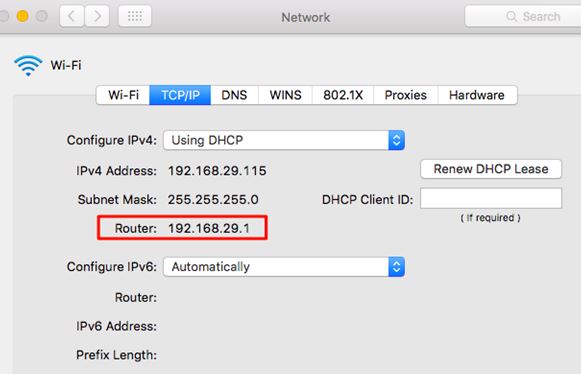
- Under the “TCP/IP” tab, you will find a list of information related to your internet connection, and one among thee will be your IP address. This can be found to the right of the label titled “router.” The tab screen will look like this:
Step 2: Entering the web interface using your IP address
Once you have your IP address in hand, it's time to put it to use. Boot up your favorite browser, and type in your IP address into the address box. Press Enter to continue.
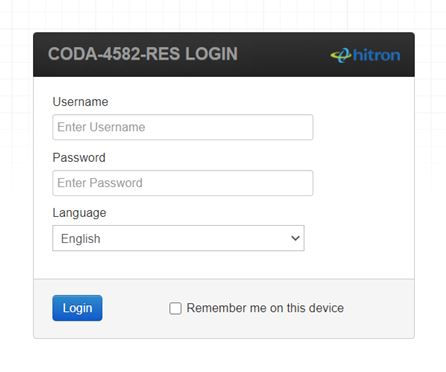
You will find that either a page or a dialog box has opened asking you for your login credentials. It will look something like this:
These credentials can easily be found on the back of your router. Normally, the username is like “admin,” and the password should be your current Wi-Fi password. If you cannot find these credentials to access the web interface, you can try this link to find a list of default credentials used to enter the interface.
Feel free to experiment with the login credentials. Another way to locate your login credentials is to flip through your router's manual. You can find a copy of your manual online as a PDF file if you look up your router's make and model. Also, try searching for default credentials to your specific router on the internet.
If none of these options work, call your internet service provider and ask for assistance to reset your login credentials to change your Wi-Fi settings.
If, in the case, you've set a custom password and cannot remember it, you will need to reset your router so that you can revert it to its default settings.
Step 3: Access the interface and change the Wi-Fi password as desired.
Once done logging into the interface, you will find that a variety of information is presented to you, including details of your router, the internet plan you have opted for, a list of devices currently connected to your Wi-Fi, and so on. Please take a moment to familiarize yourself with the tools and settings they provide. Once you can navigate through the interface without confusion, locate the Wi-Fi settings. This is likely to be on the first page that you see, but if that isn't the case, feel free to click around until you find it. It may also be under a tab titled "wireless" near the top of the web page. Remember, the interface varies with each internet provider, so what's be on your screen may not be the same thing on a friend's screen.
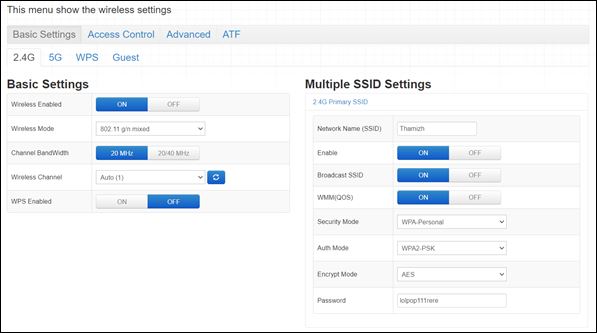
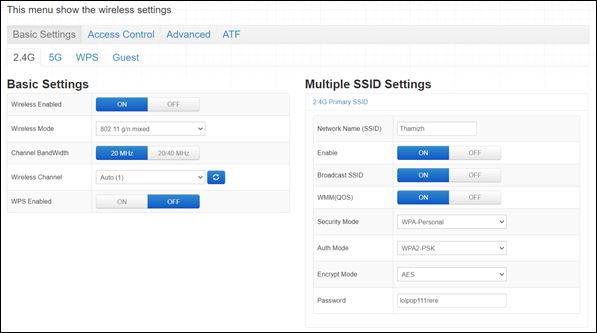
Once you find the Wi-Fi settings, locate an option labeled “Network name” or “SSID.” This is the setting to your Wi-Fi's name. Use this to change the name of your network, if desired. Your screen will look similar to the following image:
Now comes the jackpot. When you are ready, locate the option for changing the Wi-Fi password. This may be titled something along the lines of “WPA-PSK key” or “password” or “passkey.” You will find that different routers utilize different names. One found, choose a strong password, usually a mixture of letters, symbols, and numbers. Use this tool to generate a random password to ensure utmost security.
Once you change your network settings to your desired name and password, proceed to save your settings. This can be done by pressing on the button titled “apply” or “save” or any other similarly named option. Finally, exit the web interface and store the router's login credentials somewhere safe so that you will have it handy when you need to use it again.
You will find that all your devices previously connected to your internet have now been disconnected. To reconnect these devices, choose your network and enter the newly set password in the device's network settings.
