How to install a printer driver manually and from a device
Suppose you want to print documents on your computer and you find out your PC doesn't have printer drivers? It becomes challenging if you don't have the printer installer device at hand. However, as you will discover in this article, it is still possible to install these drivers regardless of your computer's operating system.
You can install printer drivers on your PC without the installer by downloading the drivers from the printer manufacturer's website and installing them on your computer, then adding the printer on hardware devices of your computer. If the drivers are unsigned, you then need to disable the driver signature enforcement.
If you are having trouble installing your printer drivers, this post is just for you. I will tell you how you can install a printer driver without the installer. I will also go into details on what an unsigned driver is and share with you how you can get it installed. Stick around and continue reading this as the lessons begin.
How to install a printer driver manually and from a device
To get us started, let's first understand what a printer driver is, and a printer driver in your computer is similar to a print processor. I can therefore define a driver as the software that helps convert the data into a format that a printer can easily understand. Applications will therefore have the ability to carry out the printing task without understanding the technical details of different printer models.
Printer drivers are an essential component in your computer's interaction with the printer as they tell the printer what to print and how to print it. Here are some of the things that a printer driver does that make it very useful:
- It translates the instructions that you send from your application software or operating system into a language that your printer can understand, therefore ensuring it can respond appropriately to these instructions.
- It also communicates the print settings that your printer needs to use when printing a document. The print settings may vary from the default ones you have stored in your printer driver to those you have personally selected to print a specific copy.
I am going to put printer drivers into two main categories as follows:
- Printer Command Language (PCL) drivers are the most common printer driver due to their efficiency and compatibility with most operating systems. A PCL driver is printer-dependent. It, therefore, means that the appearance of your print job will vary from one printer to the next.
- Postscript (PS) drivers: This is a more specialized type of printer driver. It is primarily critical in graphics-heavy applications and print shops. For a PS driver, the instructions are to make the print job precisely appear on the screen. This process takes more time and storage and is a bit slower, but the results are appealing.
Because printer drivers are fundamental, you must always have them installed and up to date. You may be familiar with instances when your printer fails to function as expected. For example, your computer may fail to recognize your printer or see black lines printed on your document. Such print problems are related to the printer drivers.
What else does a printer require to operate?
A printer requires two things to operate with your computer: the appropriate software for the specific operating system, which enables the communication between the printer and your machine (drivers), and the proper physical connection. Without either of these, it would be impossible to function.
There are wireless and cable-enabled printers. The majority of modern printers are USB enabled, thereby able to connect with all types of computers. While the older printers used parallel ports, modern ones use cable A-B, which are widely available. Either way, you can use a special similar USB cable adapter to get around this.
Wireless printers have printing features such as Bluetooth connections. If you are using a wireless printer, then your computer should have the same features. Unfortunately, Bluetooth is more common in laptops rather than desktops. The other commonly used wireless connection is Wi-Fi, whereby the computer connects with the printer via a wireless router. Nearly all printers in the market have a USB connection which makes it easier to use with all computers.
To ensure your printer runs smoothly, let's get into the learning phase on how you can install a printer driver without the installer.
How do I install a printer driver without the installer?
Your printer may come with a disk making installation very easy. However, in other cases, you may lack an installer. We are glad to inform you that it is still very possible for you to install a printer driver without the installer in such instances. Here are the instructions you will need to follow:
- Go through your printer's manual. In most cases, it may have specific instructions depending on your printer model to install your printer with no software. These instructions will help you in finding and downloading the printer's software.
- Then visit the manufacturer's website. For instance, if you are using an Epson printer, you can go to epson.com/; if it is an HP printer, go to www.hp.com/, and if it is a Canon printer, go to www.usa.canon.com/internet/portal/us/home/support.
- While on the website, go to the printers tab, and if there is a search bar at the top of the website, you can type in the model name of your printer then move to the next step.
- You will then need to find the software download link. On some websites, you will find the download software link in a small-sized text at the bottom of the page. Click on this download link and wait for the printer's software to download.
- If you have downloaded your software in a zipped file, you will need to unzip it. You can do this on Windows by double-clicking on the folder, clicking on OK, choosing a location then clicking on Extract here to unzip it. Mac users can quickly double-click on the folder to open it.
- Next, on Windows, double-click on the software file to run it. Mac users may need to verify the software before proceeding. You can then follow the prompts on your screen until the installation is complete.
- Once done, it's time to connect to your printer. You can do this either using a USB cable or through Wi-Fi. If you are using Wi-Fi, ensure that you first join the computer and the printer to the Internet.
Let's also mention that to install a printer on your computer; you will need to follow these instructions:
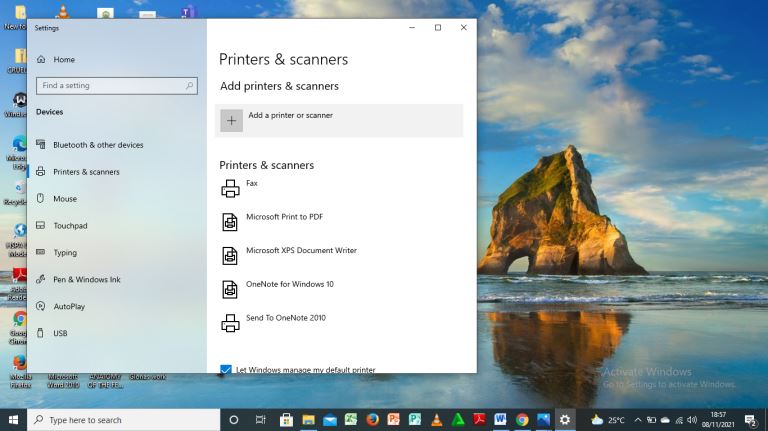
- Click on the Start button, then select Devices, then pick Printers, and choose Add Printer.
- From the dialog box indicated as Add Printer, click on Add a Local Printer, then Next.
- Choose a Printer Port from the drop-down menu, or you can go with the option recommended by your printer. You will then click on next.
- It's now time to add your driver. When the disk that came with the printer is missing, choose the driver you downloaded from the manufacturer's website.
- You can then name your printer before clicking on Finish.
- To confirm that the entire process has been successful, run a test print with a random document on your computer.
What is an unsigned driver?
Have you ever downloaded a device driver on Windows, and when trying to install it, a warning pops up telling you that the driver is not signed and shouldn't install it? Well, that was a real hint the driver you have just downloaded is an unsigned one.
Before we get into details on an unsigned driver, let's first understand what a device driver known as a driver is. A device driver is a computer program that controls or operates a specific type of device that is attached to your computer. An excellent example in the context we are focusing on is printer drivers.
A device driver will provide a form of software interface for hardware devices. It does so by ensuring that your computer's operating system and other computer programs can access certain hardware functions without understanding the precise details about the hardware. There are two types of device drivers, the signed one and the unsigned one.
When a signed driver comes with a digital signature, it will indicate that the digital signature is linked to a digital certificate that recognizes the publisher of the driver as someone who is verified by the independent certification authority. The digital signature also proves that the driver is free from damage, corruption, or manipulation and is, therefore, safe to use.
On the other hand, an unsigned driver does not have any verification from the publisher and cannot be traced to a certification authority. Such a driver may have undergone some changes from the time when it was released to the public. Therefore, if a driver has been interfered with in any way, its signature will become invalid, and it will be considered unsigned.
Unsigned drivers are not safe. They can result in problems such as system crash. You are probably wondering how you can check whether the driver you have already installed on your computer is signed on unsigned. We are happy to notify you that it's easy to do so. What you will need to do is make use of a File Signature Verification tool such as sigverif.exe.
A File Signature Verification tool will first scan all the device drivers on your computer. After completing the scan, it will list down all the unsigned drivers you have on your computer. After getting your unsigned drivers list, you can decide what you want to do with the unsigned drivers.
Suppose you decide to remove the device drivers. In that case, you must be very careful, especially with video drivers- this is because removing a video driver in use will affect your display and even cause it to turn blank.
How do I force an unsigned driver to install?
Some computer versions like Windows 10 and 8 come with a driver signature enforcement feature. This feature is a limiting factor that only allows them to install drivers that Microsoft has signed. To install unofficial drivers, old unsigned drivers, or drivers you are developing personally, you will need to disable the driver signature enforcement.
Driver signing enforcement isn't entirely a bad thing. It is Microsoft's attempt at preventing malware from finding its way into the Windows kernel. Before you disable the driver signing, you will need to be sure that the drivers you intend to install are from a trusted source.
There are two ways to disable driver signing enforcement to get your way with installing an unsigned driver. They include:
- Enabling the test signing mode
- Using the Advanced Boot Menu
By enabling the test signing mode
Let's have a look at this first method. Windows often come with a test signing mode feature. The driver signature enforcement will be disabled when you enable this mode until you leave the test mode. Here is how to do it:
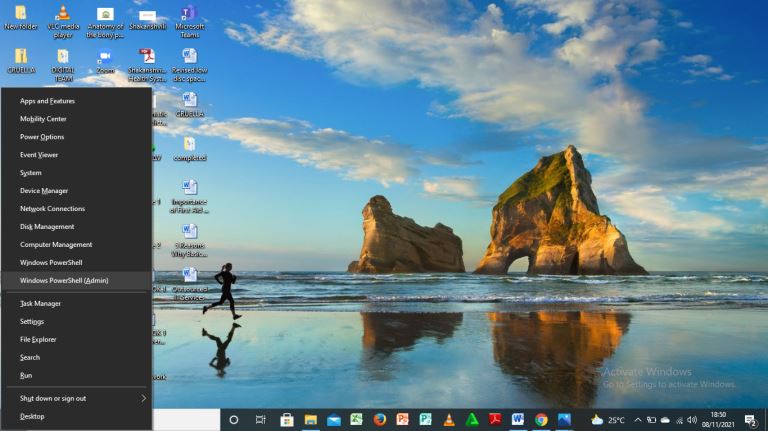
- To enable test mode, you will need to run a command from an Administrator Command Prompt. To launch it, right-click the start button or press Windows +X and then select “Windows PowerShell (Admin)” or “Command Prompt (Admin).”
- Next, paste the following command into the Command Prompt window: BCD edit /set test signing on. Then press “Enter.”
- You may get a message saying the value is protected by Secure Boot policy, meaning that Secure Boot is enabled in your computer's UEFI firmware. You'll therefore need to disable it to enable test signing mode.
- You will then need to restart your computer to get into test mode. You will see a “Test Mode” watermark at the bottom of your desktop near the clock indicating that test mode is enabled.
- After enabling test mode, you have all the freedom to install any unsigned drivers you want to.
Leaving the test mode is relatively easy. Just open the Command Prompt window again as an administrator. You'll then need to run the following command: BCD edit/set test signing on.
Using the Advanced Boot Menu
The advanced boot menu is the easiest way to install unsigned drivers on Windows 10 or 8. Using the advanced boot options menu, you can boot your Windows and disable the driver signature enforcement. It results in a temporary change since the next time you restart Windows, it will boot with the driver signature enforcement enabled once again.
Here are the instructions you need to follow:
- Go to the Windows 10 or 8 advanced boot options menu. You can do this by holding down the shift key while clicking on the “Restart” option. You will notice that your computer will restart the menu.
- Select the “Troubleshoot” tile when an option screen appears, then choose “Advanced options.”
- The next thing you will do is click on “Startup Settings” then the “Restart” button to restart your PC into the startup settings screen.
- To activate the “Disable driver signature enforcement” option, type “F7” or “7” on the Startup Settings screen.
- Your computer will boot with the driver signature enforcement disabled. You are now free to install any unsigned drivers as you wish.
By following either of the methods, we have shared above; you will be able to “force” install an unsigned driver on your device easily.
Conclusion
As I conclude on this highly educative piece, I hope that you have been well-equipped with the knowledge and skills you need to have at hand when installing a printer driver manually. I have proven that the process is quite an easy one and all you need to do is follow the simple instructions step by step.
I have also enlightened you on what an unsigned driver is. As you interact with your computer daily, you need to have such information at your fingertips. Knowledge on how to check for unsigned drivers is quite helpful when you need to troubleshoot problems with your computer.
