How to setup virtual machine on Windows 11 and Windows 10
pThere are different ways to set up a virtual machine on your PC If you want to create a virtual machine in a hrefhttpswwwgeekcomputercomwikihowtounlockcomputerscreenwindows11 targetblank relnoopenerWindows 11a HyperV is the best tool to use HyperV i
Did you know you have access to two operating systems on one computer? It is possible to install Windows 11 on your Windows 10 PC, even if your computer doesn't meet the requirement. Well, I have compiled the best guide to set up a virtual machine (VM) on your laptop.
There are different ways to set up a virtual machine on your PC. If you want to create a virtual machine in Windows 11, Hyper-V is the best tool to use. Hyper-V is a hypervisor—a technology that allows you to create a virtual machine (VM) on top of Windows that can run other operating systems. VirtualBox is a multi-platform virtualization software. It can be used to create virtual machines that run multiple operating systems on a single machine. VirtualBox allows you to install and run multiple operating systems on multiple virtual machines, including Windows, Linux, Solaris, and others.
Apart from showing you how to set up a virtual machine, I will also tell you why you need it, its requirement, and the best one in the market, both free and paid.
How to setup virtual machine on Windows 11 and Windows 10
What is a virtual machine?
A virtual machine is computer software or virtual computer within a physical computer or server. The machines can imitate other programs and devices.
You can customize them according to your needs, i.e., the CPU, memory size, storage, network drivers, e.t.c.
The machine has its environment, making it work in a different environment. It makes it easier to perform functions like running their operating systems separately from the real computer.
The virtual machine's operating system (guest OS) can sometimes be different from the host computer.
Types of Virtual Machines
They get categorized according to their functions and the workloads they handle. These categories are:
1. System virtual machines
It is when full virtualization environments get hosted on physical computers and servers.
They have their operating systems and physical resources that help manage hardware and separate multiple environments from each other.
They rely on Hypervisors during virtualizations. These include Microsoft Hyper-V
2. Process Virtual Machines
They are temporary, allowing programs to run in environments that support single processes.
An example is running a Java app on the Java Virtual Machine, which supports Java programs only.
Uses of Virtual Machines
There are several uses of virtual machines.
- For testing bugs in products and apps before releasing them.
- For creating environments for developers to perform tests.
- Accessing data affected by malware by installing the old OS on the virtual machine. It makes running apps and operating systems that you are not sure about.
- They make it easier to deploy apps to the cloud.
Benefits of Using Virtual Machines.
Virtual machines have helped a lot in reducing several issues faced by different organizations, companies, startups, e.t.c.
Some of the benefits include:
1. It's more secure. They have recovery and separate hardware in case of any issue it's easier to get the data. You can also perform individual security analyses of each machine separately to find any issues.
2. Easy to customize. When setting up the virtual machine, you choose all the specifications according to your need. For example, during setup, you choose the hardware and memory size, e.t.c.
3. Saves costs. Before the emergence of virtual machines, most organizations used a lot of cash to buy expensive hardware and infrastructure for their apps. When virtualization came, installing software, apps, and operating systems on the virtual machines was at low costs. You were able to host multiple environments on the same computer.
4. It's more flexible. It makes running several operating systems on the same virtual machine. For example, you can run Windows 11 on different operating systems, i.e., Mac, Linux but the same computer.
5. Saves time. Companies can organize with service providers to take care of virtual machines. It also saves time during deployment. They use already configured templates to speed up the process.
6. They are portable. It is easier to move virtual machines to different environments with minimal effort. It is easier to isolate them due to their virtual hardware, making it easier to move it from one physical server to another.
7. Easier to scale. If you want to increase the performance of your apps or system, you scale it by increasing the virtual servers and physical firmware settings. It leads to equal distribution of workload on several virtual machines.
Disadvantages of Virtual Machines
Virtual machines have several disadvantages:
- Failure to consider specifications requirements during installation can result in poor performance.
- They are less efficient when hosting them on hardware. It makes companies have both virtual and physical systems.
- A weak and poorly structured host can expose the system to malware attacks.
How to setup virtual machine on Windows 11 and Windows 10
All the Windows 10 and 11 come with preinstalled software that can help you set up virtual machines without using third-party virtual boxes. It supports all Windows versions except Home.
They come with pre-installed Hyper-V. Hyper-V doesn't fit all the machines, you have to make sure it meets the following specifications:
- CPU should support Second Level Address Translation, 64-bit processor, and offer VM monitor mode extension support.
- At least 4GB of memory.
- Enable virtualization technology in the BIOS settings
Now let's set up the Hyper-V.
1. Setting up Virtual Machine Using Hyper-V Quick Create option
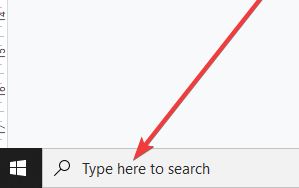
On the search button, type Windows features and press Enter.
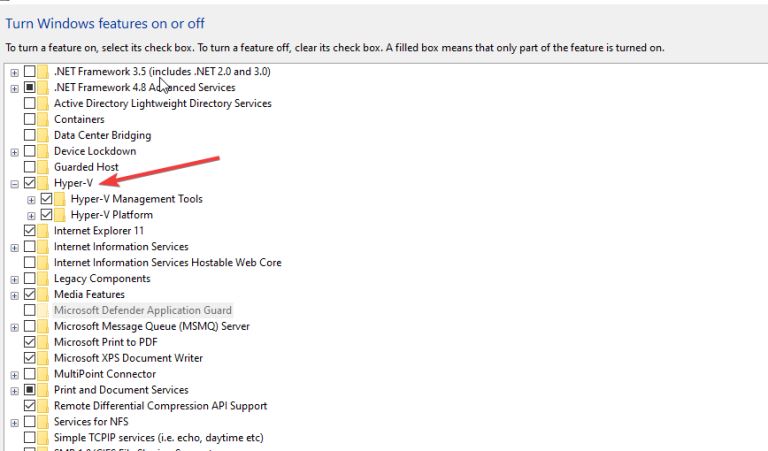
Select the Hyper-V checkbox to turn it on and click OK.
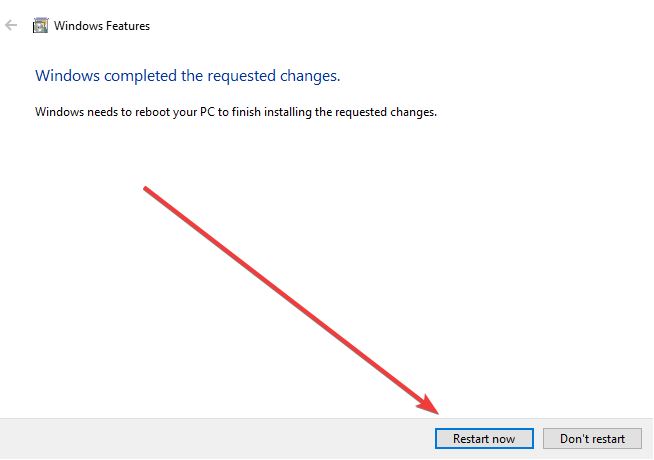
You have to restart the machine to complete the installation of the required packages.
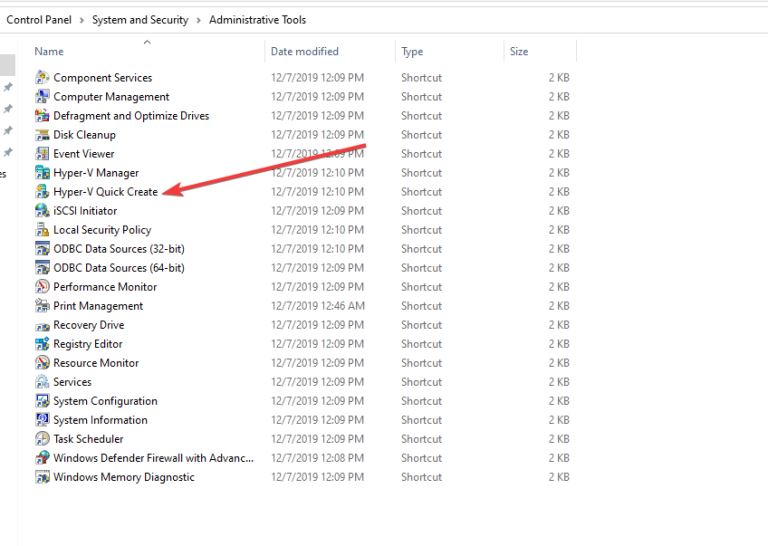
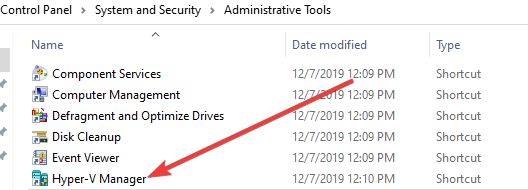
Now let's launch the Hyper-V. Click on the start button and search for Windows Administrative Tools. Click on it to expand it and select the Hyper-V Quick Create option.
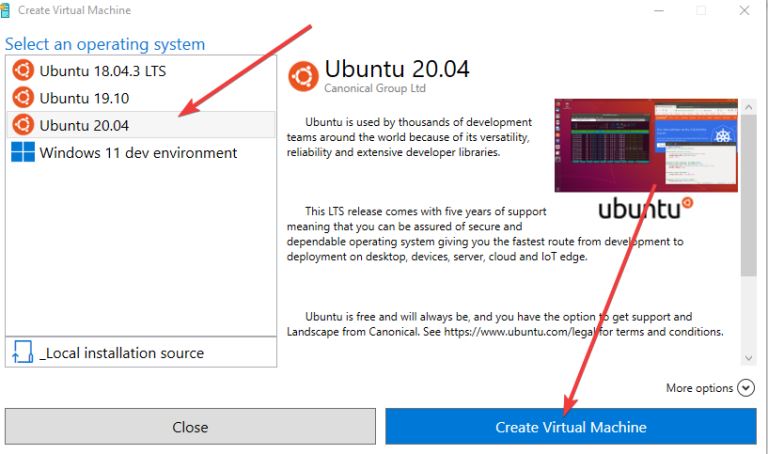
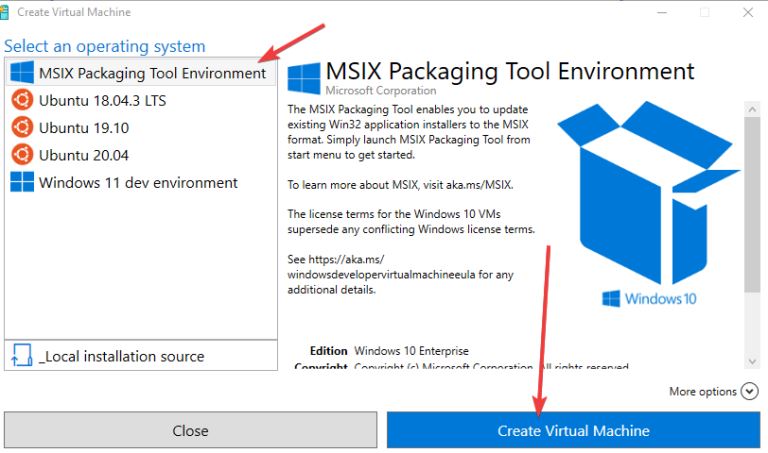
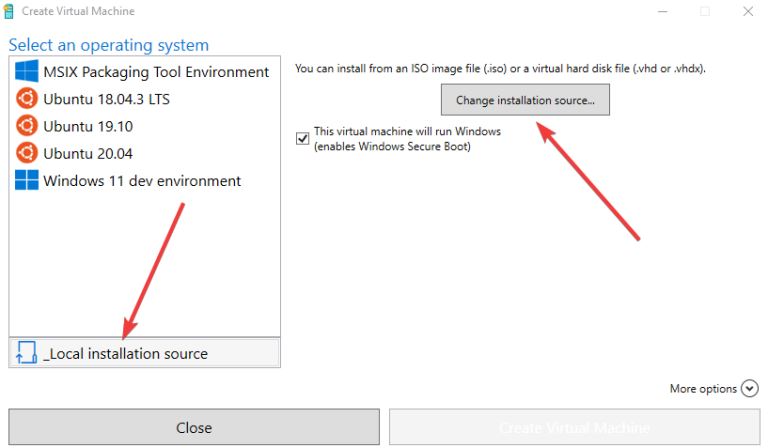
It will provide you with four options: Ubuntu 19.10, Ubuntu 20.04, Ubuntu 18.04.2 LTS, and Windows 11 dev environment.
Choose one of them and click Create Virtual Machine.
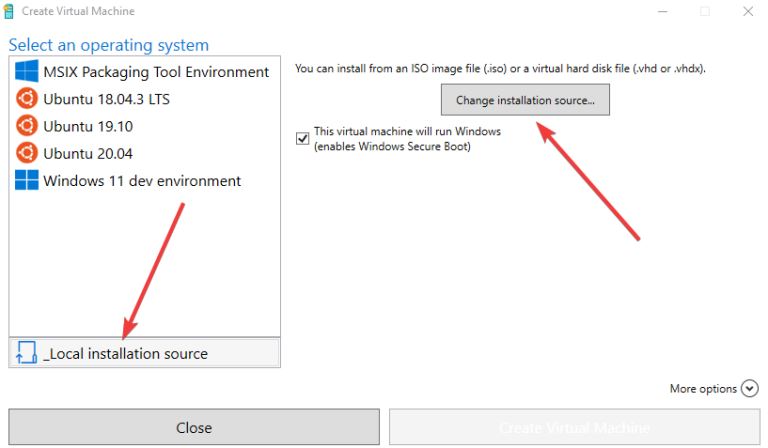
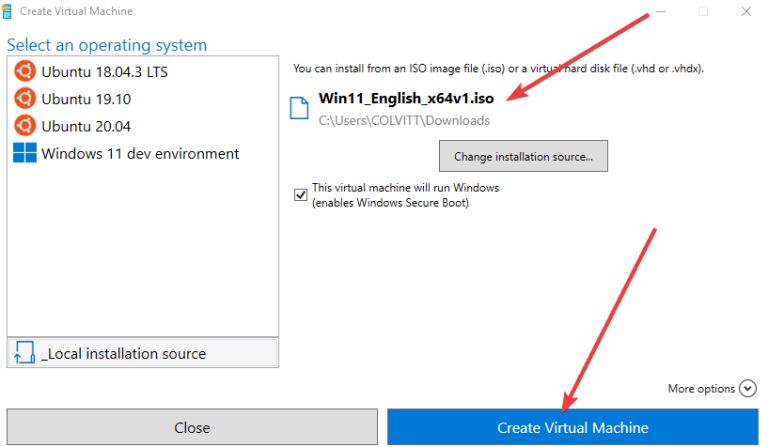
If you have another operating system you want to use and is not listed on the four, select the Local Installation Source option, then click on Change Installation Source to choose the .iso image.
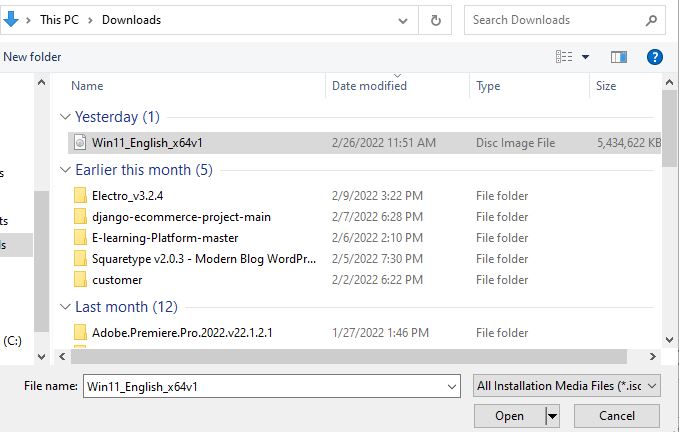
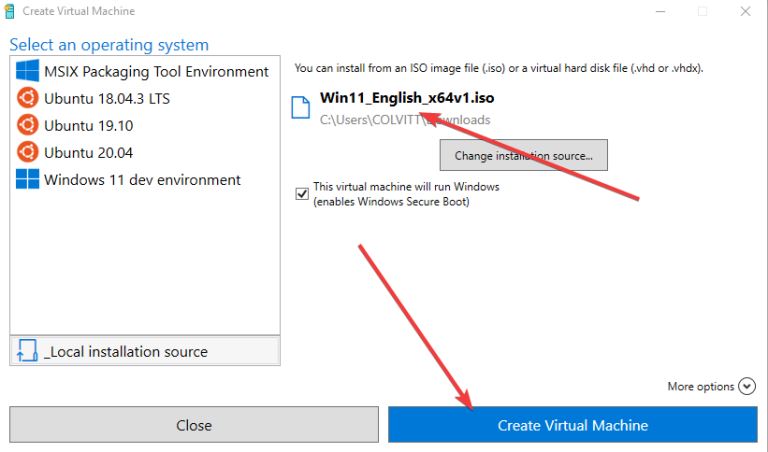
Now upload the iso image.
After uploading your ISO image, click on the Create Virtual Machine button.
It applies to both the Windows 10 and 11 operating systems.
2. Creating Virtual Machine Using the Hyper-V Manager
It is an option if the first one doesn't work. We shall use the same procedure above but with a different option. It is quicker, and you get a lot of advanced tools for creating a virtual machine.
Go to the start button and search for Windows Administrative tools. It will open up several tools. Select the Hyper-V Manager.
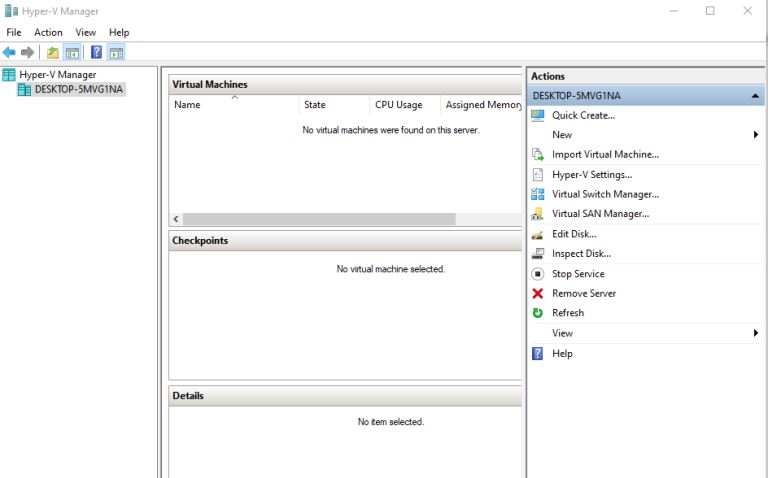
It will open the Manager window.
Select the Quick Create option located on the right.
Repeat the above steps by selecting the operating system from the list, and clicking create the virtual machine.
If your operating system is not available, click on the local installation source.
Upload your iso file and click the Create Virtual Machine button.
3. How to Access the Virtual Machine Created.
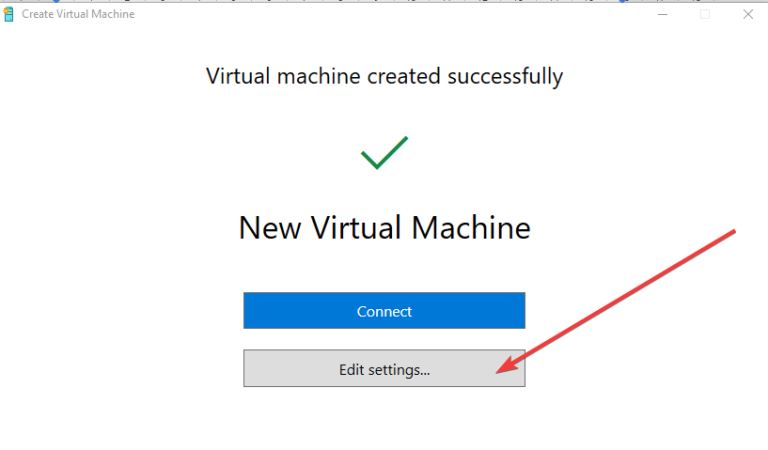
After clicking on the Create Virtual machine, you get two options, Create and Edit settings.
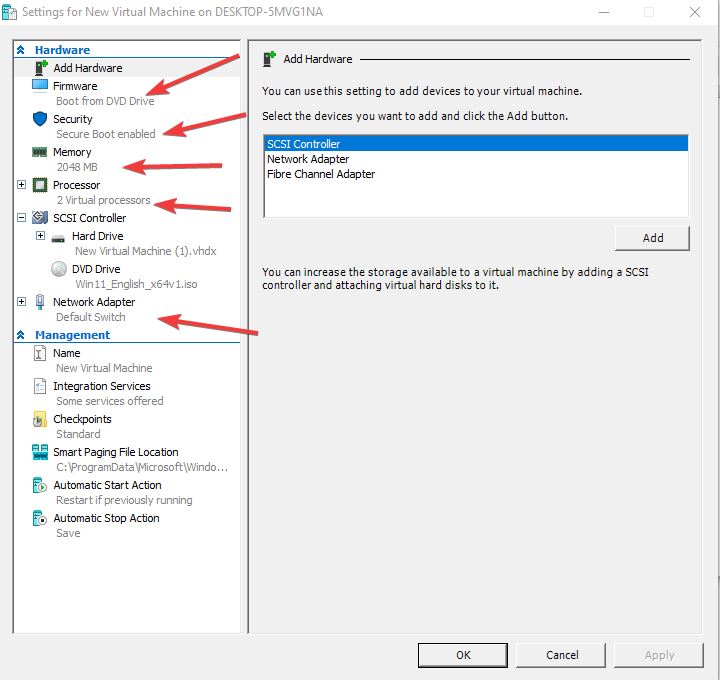
Click on Edit settings to choose the firmware, security settings, the memory size, the storage, and network settings, and then click Apply and OK.
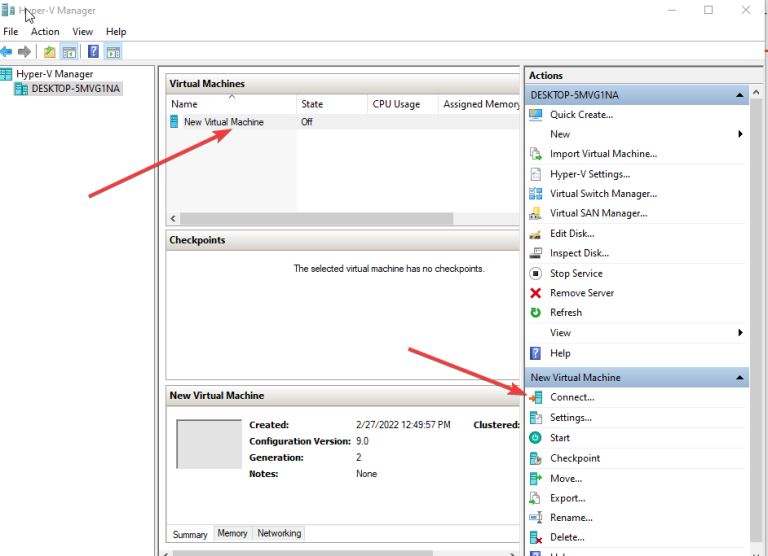
To finish setting the machine up, we now change some settings. Click on the start button, search for Hyper-V manager, click on it to open the machine created. Then select the connect option.
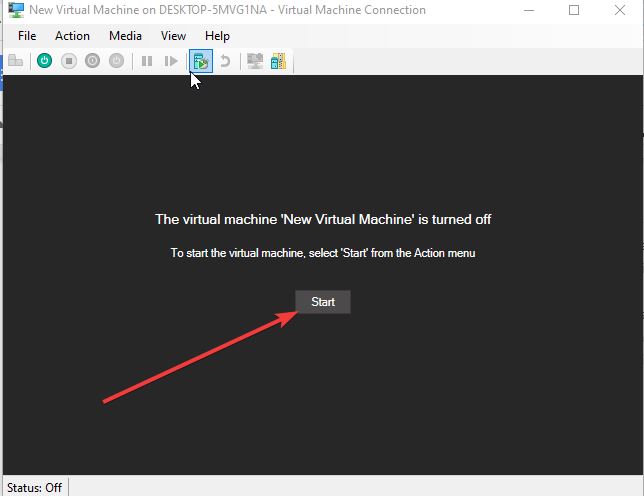
It will launch the machine and give us the option of starting our machine by clicking the start button.
You use the same process using the shutdown icon in the menu bar to shut down the machine.
How to install Windows 11 in a virtual machine
Windows 11 is the latest operating system and people have fears trying it out. If you are unsure of the operating system, try using it by installing it using a virtual machine to test it out.
It helps users avoid the worries of bugs affecting their files, test all the features of Windows 11 without interfering with your existing operating system and delete it if you don't like it.
Below is a step-by-step guide that helps us install Windows 11 on a virtual machine. We shall be using the Oracle Virtual box.
1. Download Windows 11 and create an ISO
To get a Windows 11 ISO file and make it bootable, you have to download it first.
Head over to the official Microsoft website, scroll to the download windows 11 disk image, select Windows 11(multi-edition ISO), and click the download button.
After clicking on the button, you get a prompt to choose the time, language, and region and confirm.
The download will take a few minutes.
When creating the virtual machine, make sure the properties you set to meet the Windows 11 system requirements are as follows:
- 720 HD display
- Minimum of 4GB RAM
- 64GB storage
- 1GHz processor
- Enable UEFI
2. Downloading and Installing Oracle Virtual Machine
Oracle virtual box is one of the best machines, and it's free to download and use.
Go to the oracle virtual website, select the operating system you run, i.e., Linux, Windows, and macOS, and click on the download link. Mine, I will select the Windows hosts.
The file starts downloading and only takes a few minutes. Double click on the executable file to store it in your preferred location.
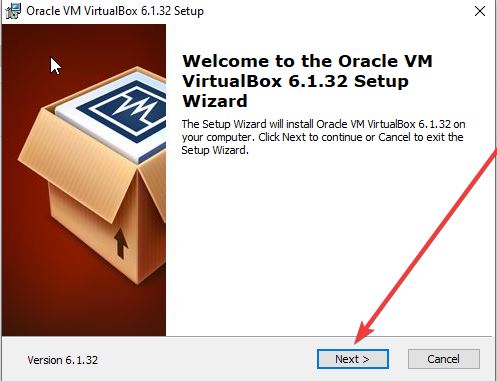
Click next and follow the following prompts, install the network interfaces when prompted.
After installation, you can access it from the Start Menu or the desktop shortcut icon.
If you face any trouble installing the virtual machine, try deselecting the USB options provided during installation.
3. Creating Virtual Machine for Windows 11
We now want to create a virtual machine for the Windows 11 iso. This procedure allocates new resources and uploads the Windows 11 iso to the virtual machine.
Windows 11 needs some more resources, and when installing, it's good to consider its specifications.
Launch your virtual machine and click on the New button to create the virtual machine.
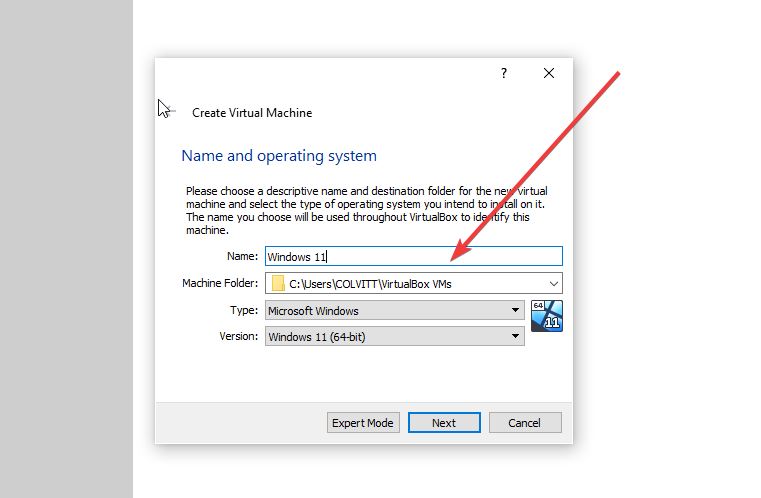
Give it your desired name, choose the destination folder, on the type, select Microsoft Windows and click next to create it.
4. Allocating the required resources to the machine
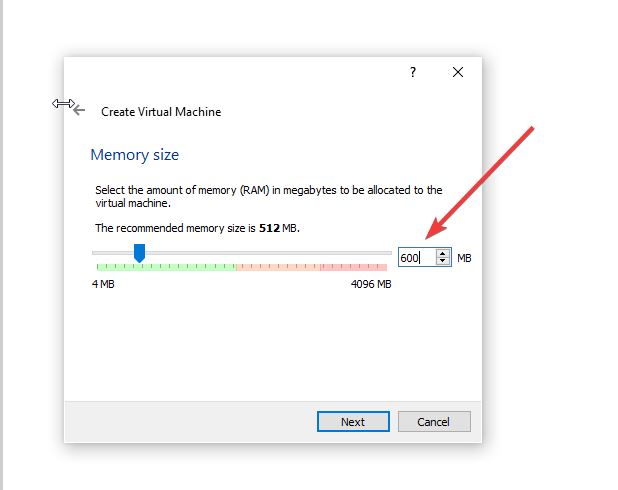
When you click next, you get a prompt to choose the memory size. They recommend a minimum of 512 MB, but you can increase it according to your memory size.
When choosing, make sure the RAM meets the specific requirements.
After choosing the memory size, click next.
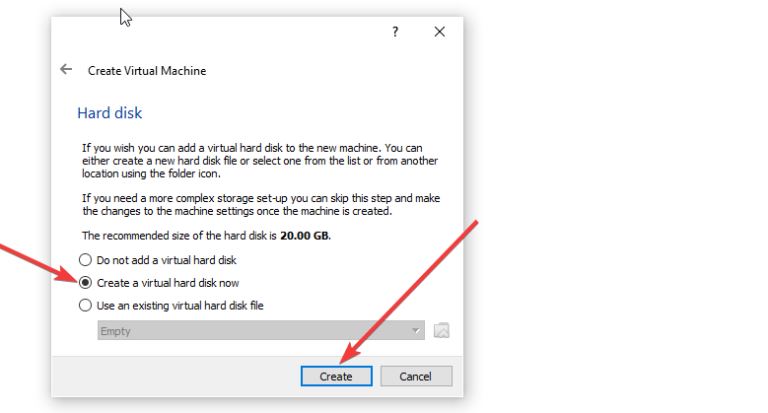
The next resource to assign is the virtual hard disk. Choose the “Create a virtual disk now” from the three options and click create. The least recommended size is 20GB, but you can assign more.
The disk stores all information from operating systems, program files, data files. These virtual disks are very portable, and it makes it easier to move them from one host to another or server to another one.
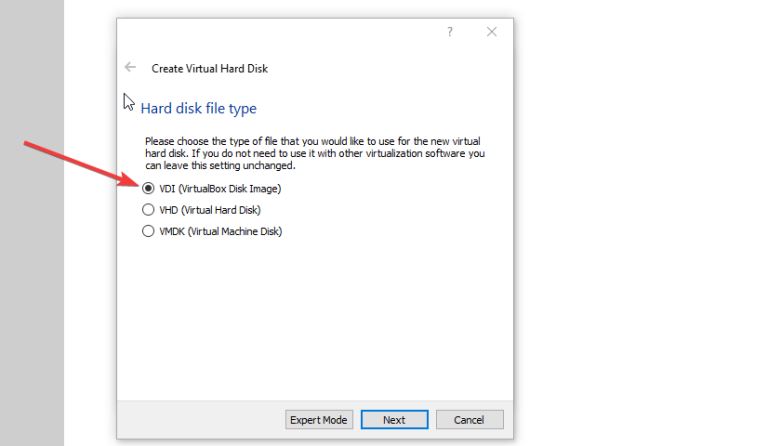
Next, choose the hard disk file type and click next to finalize this step.
Now we have set and assigned all our resources.
5. Installing Windows 11
Now it's time to install our Windows to the created virtual machine.
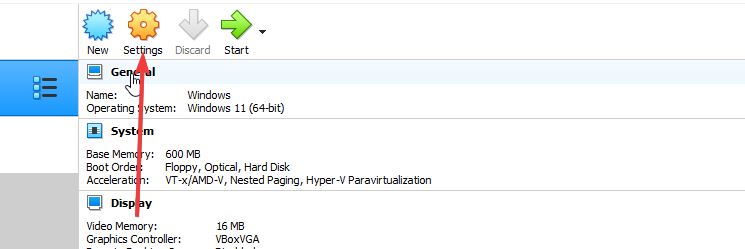
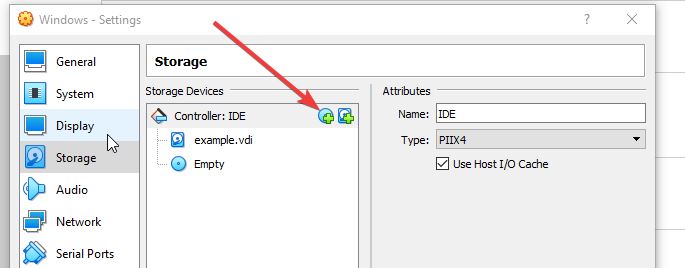
Click on the virtual machine menu you have created and click Storage.
Click the Controller menu, then select the empty blue drive.
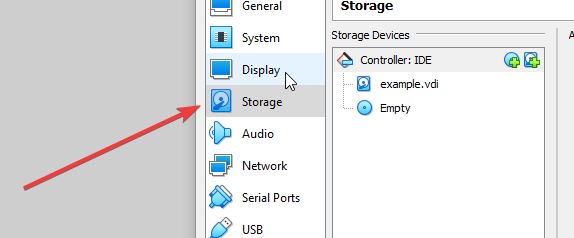
Check the CD/DVD option by ticking it.
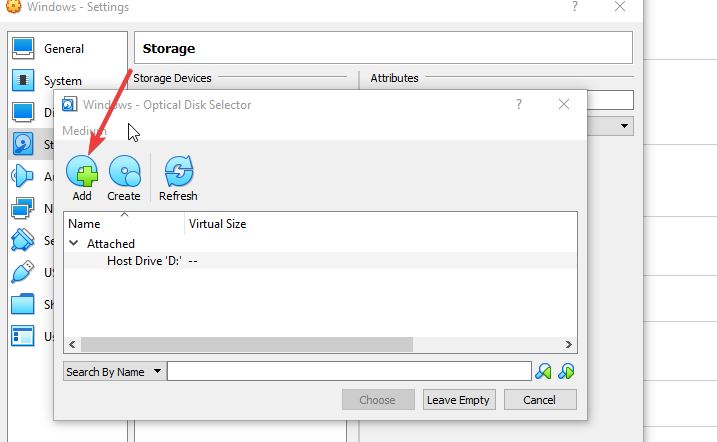
After checking the option, head back to the Controller IDE menu and click on the CD icon to upload the ISO file, add the iso file, and click on select.
Now the iso is well set, click on the Start button to restart the virtual machine.
After that, the Windows 11 installation instructions will appear on the screen.
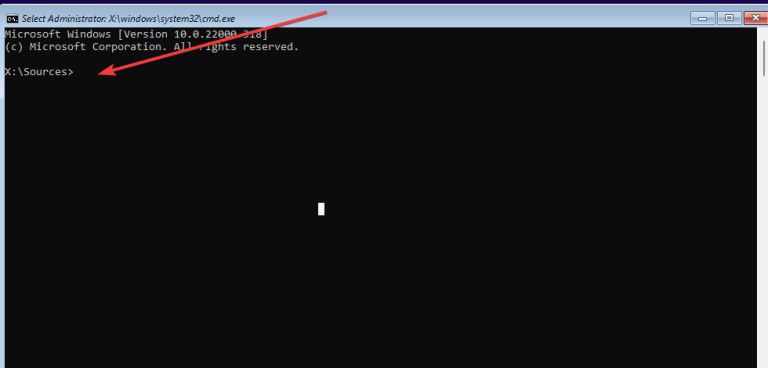
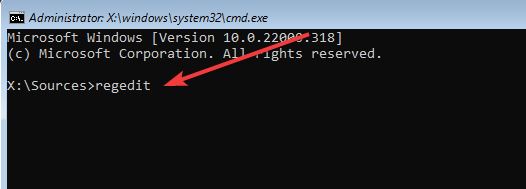
Press Shift+10 simultaneously to launch the command line.
Type regedit to access the Windows Registry Editor.
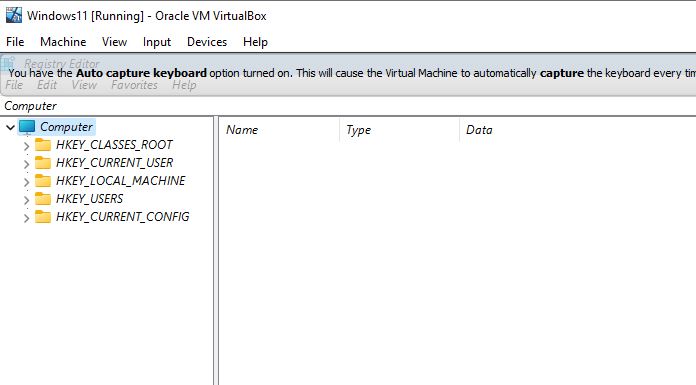
It opens theWindows Registry editor.
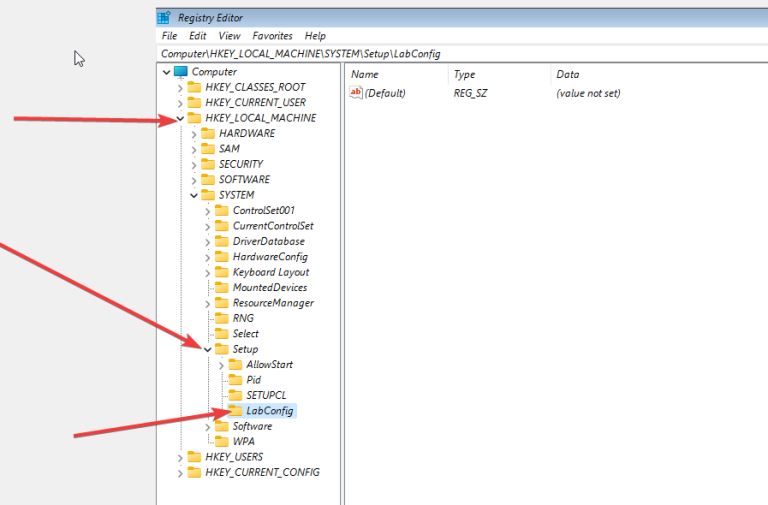
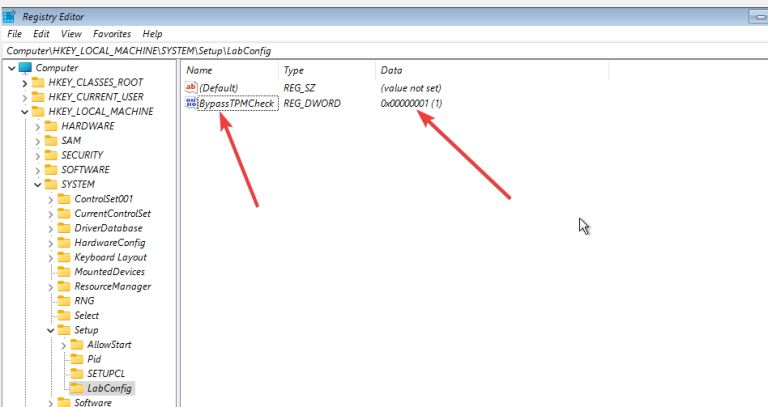
Head over to HKEY_LOCAL_MACHINE\SYSTEM\Setup, right-click on the setup, and create a new key. Name the key as LabConfig and press Enter.
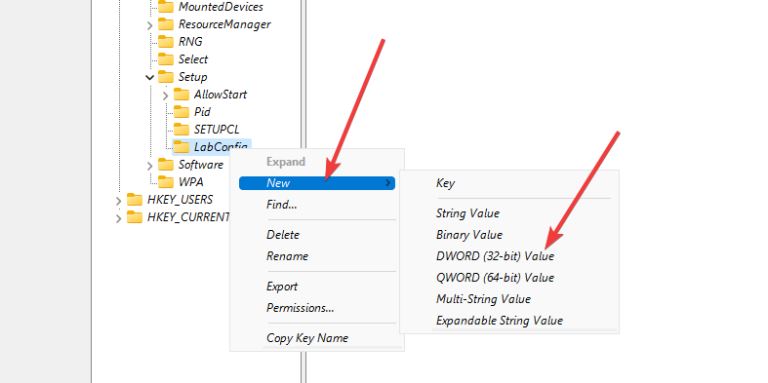
Now right click on the key created and then select New, DWORD (32-bit) Value and name it BypassTPMCheck.
Right-click on it navigate to modify the binary value to 1.
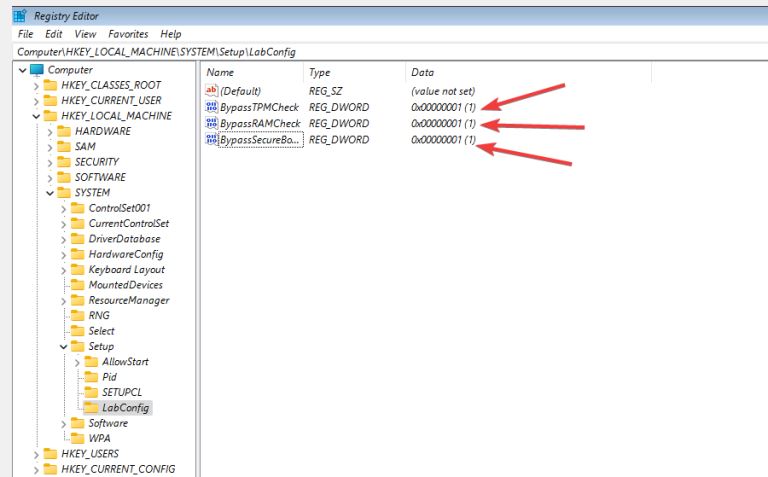
After achieving the first value, under the LabConfig Key, let's create two more values named: BypassRAMCheck and BypassSecureBootCheck and assign 1 to their data.
Here are the three values created.
After creating all the three values, exit the registry editor, and let's go back to continue with the Windows installation.
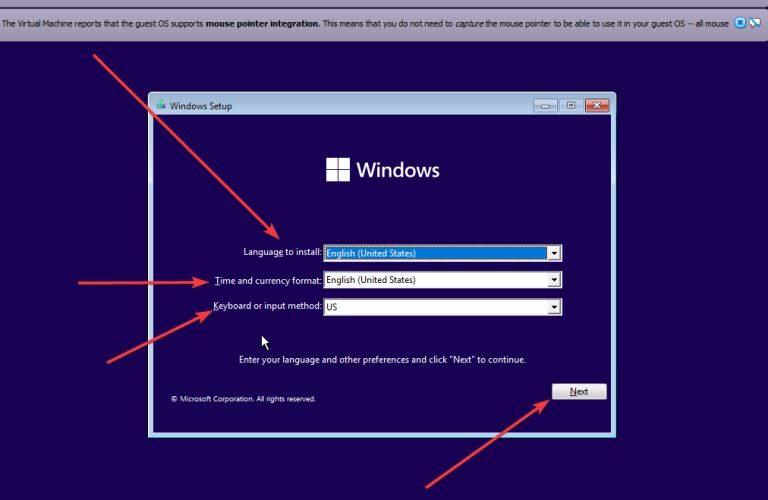
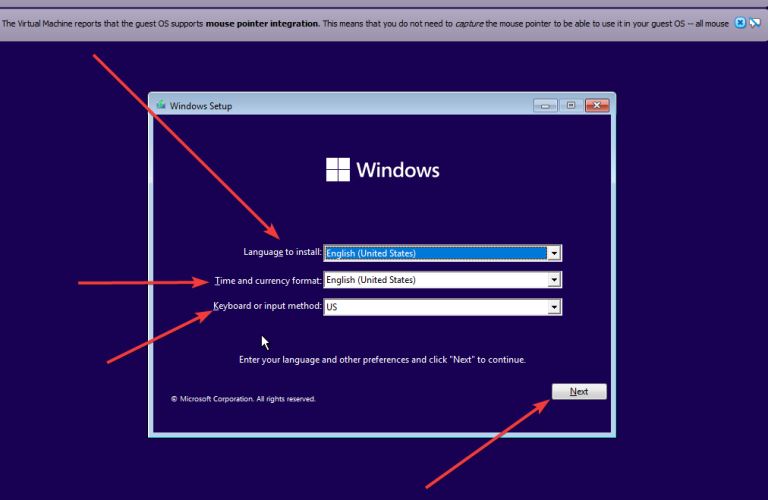
Fill in the required basic details like language, currency, keyboard inputs, and other details. Click next, Install now, and the setup will start.
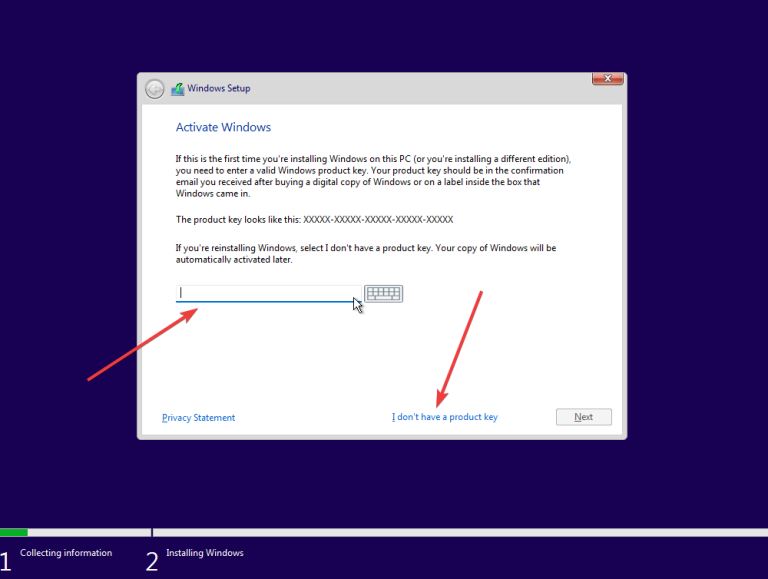
After clicking next, you get a prompt to enter the product key. If you don't have it click I don't have a product key.
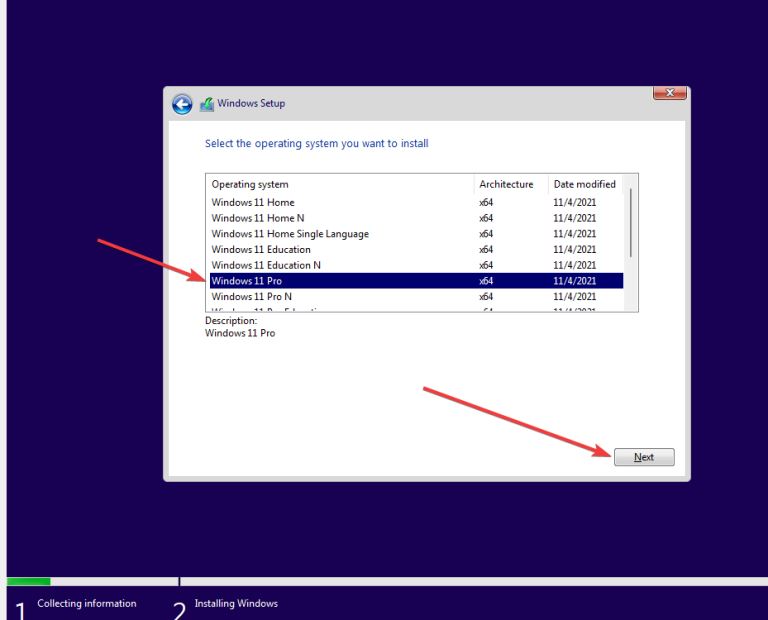
Choose the type of Windows 11 you want from the list provided. Choose any version except Home and click next.
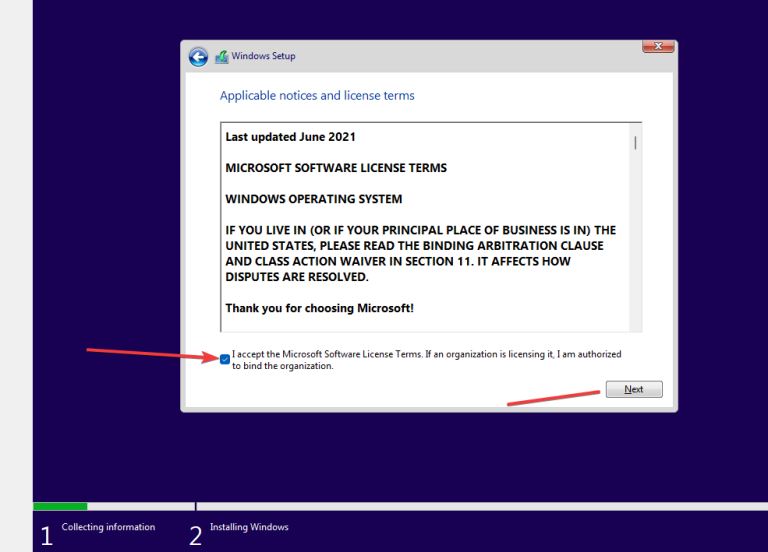
Accept the license terms and conditions and click next.
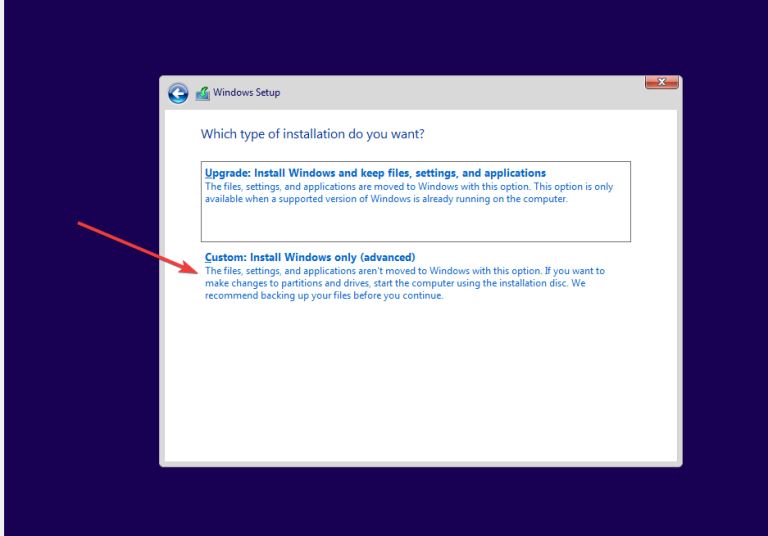
Choose custom installation.
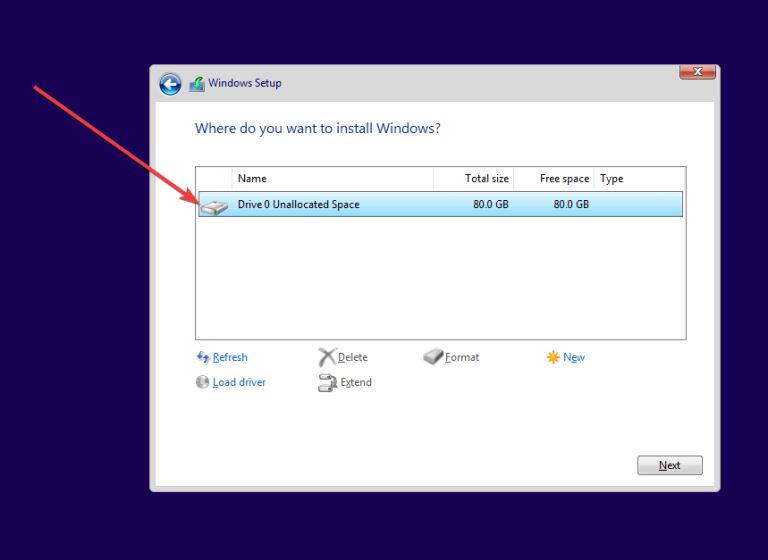
Customize the disk you will install either by formatting them or clicking next.
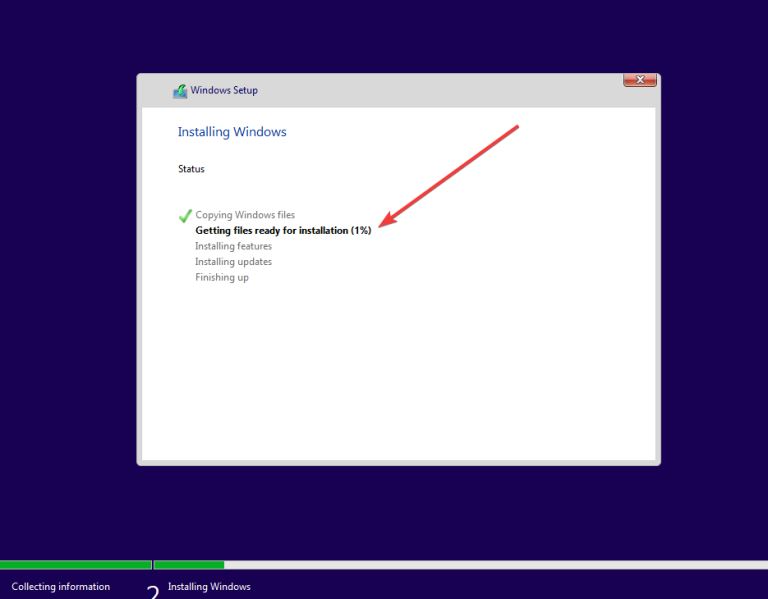
The installation will start by installing the window files, features, and updates until it ends.
At the end of the installation, you provide other information like connecting Microsoft account, it will take a few minutes for the installation to be complete.
Which virtual machine is best for Windows 11?
There are several types of virtual machines that work best for Windows 11. They are best for both personal and commercial use.
Most of them are free for home use, but you have to pay for licenses to enjoy user experience and more features for the enterprise.
We will look at a list of the best virtual machines for Windows 11.
1. Oracle VirtualBox
VirtualBox is a virtual machine made by Oracle and boasts 80,000 users. It is good for personal and enterprise use. Everything is free and doesn't require any payments.
Oracle partners with other developers to produce extra features and support multiprocessing on other operating systems.
It is good for testing, checking workloads, learning, and trying out different arrays of virtual machines.
Features of VirtualBox
- It supports the latest Windows version.
- It's open-source, making anyone contribute to its development.
- It offers good performance.
- Has several extensions like Remote Desktop Control and USB pass-through, disk encryption
- It is compatible with other hardware devices like keyboards, mice e.t.c
- It has several virtual machines templates.
2. VMware Workstation
It is one of the biggest virtual machines due to its versatility and ability to support different operating systems.
It has both a free and paid virtual machine that comes with several additional products and features.
To access features like customer support, creating clones, taking snapshots, and controlling remote connections, you must subscribe to the paid plan.
The paid part has three plans: Player, Pro, Pro+Support. Each has its features and price, and they are mainly used for commercial use.
Features of VMware Workstation
- It is free and easier to use.
- It can create virtual machines of up to 64GB memory of RAM and 6TB virtual disks.
- It has a dark mode interface.
- It supports deployment on Kubernetes environments, local and remote deployments.
- It supports all Windows updates.
- It offers a 4K resolution display.
- It supports OpenGL and DirectX that are responsible for good graphics.
- VMware provides extra tools like GPU Virtualisation.
3. Xen Project
Its invention was by Cambridge University and later sold to Cultix, which currently works with the Linux Foundation.
They are mostly used in hardware applications, security applications, embedded and automotive systems due to their architecture, real-time support, and isolation. Used by large companies like Alibaba, Oracle, Tencent use it.
Features of Xen Project
- It is open-source, giving everyone a chance to contribute.
- Easily customizable due to its architecture.
- It is secure due to its architecture and advanced features.
4. Microsoft Hyper V
Most of the Windows comes with Hyper V preinstalled. It's free and easy to use.
The only thing you need for the Hyper V machine is the license of the Operating System you plan to install.
Features of Microsoft Hyper V.
- It uses NAT switch and SR-IOV for networking.
- It has a fiber channel(virtual).
- It supports the live migration of virtual machines from one machine to another.
- It has a shared VHDX.
- Has virtual machine gallery which is easier to create
5. Qemu
It is free and open-source, making it open for development. It works with all the latest versions of Windows.
It has full system emulation that runs on any supported architecture.
Features of Qemu
- It is easier to use.
- Higher performance.
6. Citrix Hypervisor
It is a virtual machine that consists of both free and paid versions. It started as an open-source project before the introduction of paid plans.
It was mainly meant for business users. The paid plans have many features that help in distributing the environment created. Good for collaboration due to its ability to share large files.
It supports other hosted environments, i.e., Microsoft Virtual Desktop.
Features
- It delivers better graphic workloads, e.g., NVIDIA graphic cards.
- It centralizes virtual machine management.
- It has strong security.
- It has better optimization.
7. Parallels Desktop
It helps in installing Windows 11 for Mac users. It makes it possible to share files from the virtual machine to the host's operating system. It has over 7 million users worldwide.
It has no free plans, they only offer paid plans at the moment.
Features
- It is easier to download, install and use.
- Each virtual machine has its virtual RAM and hard disk.
- Has stable security due to its encryption.
- Easy to integrate with Docker and other plugins.
- Easier to customize views on how you want to view the virtual machine files.
- They have great customer service from emails phone.
Conclusion
Virtualization is on the rise with new virtual machine products introduced. Some target big organizations, while the rest come as open-source to engage developers in building new features.
Cloud computing is the big beneficiary of virtualization, where developers and companies use virtual machines to deploy and manage their apps.
It is easier for companies as it reduces the use of physical servers and time wastage of asking product managers guidelines of deployment.
Running windows 11 virtually gives you the same experience as the one in an already installed OS on a computer. You will even be able to unlock the Windows 11 computer screen while on Windows 10 host.
