MS Word:How to Create and Manage a Table of Contents in Microsoft Word
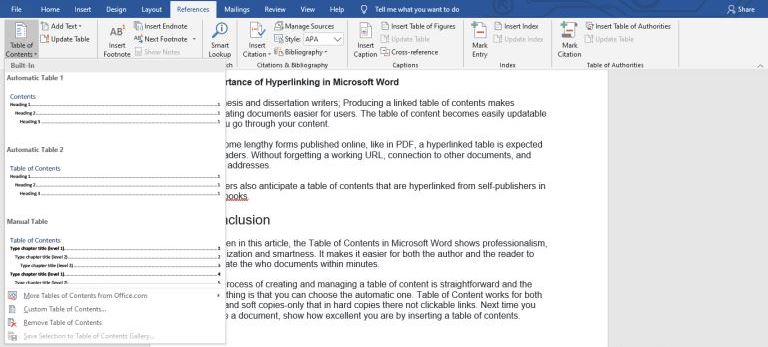
pThere are three different ways to create a Table of Contents in Word Open a blank document on MS Word then click on references At the top left of the window click on the Table of Contents You will see a dropdown menu with the following three options
Have you ever tried to go through a numerous-page document that has no Table of Contents? It s such a hectic task to trace specific information that is way far in the paper. I found it essential to guide you through expert steps to create an excellent TOC in this focus.
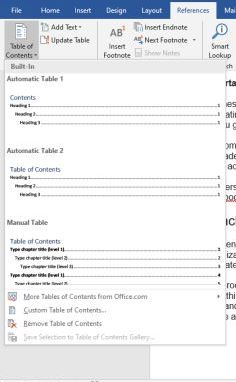
There are three different ways to create a Table of Contents in Word. Open a blank document on MS Word, then click on references. At the top left of the window, click on the Table of Contents. You will see a drop-down menu with the following three options to create and manage a Table of Contents:
- Automatic Table 1
- Automatic Table 2
- Manual Table
In each method, there are options to customize, create multilevel headings from level 1 to level 6. Automatic methods are the most preferred as they save time. Manual Table of Contents requires you to enter every heading manually in all sections of your word document.
In this article, I will give you expert information about creating and managing a table of contents in MS Word. I will show the benefits of TOC, multilevel headings, and why you need to insert TOC in every word document you create.
MS Word:How to Create and Manage a Table of Contents in Microsoft Word
Have you ever found yourself going through a hundred pages to look for a piece of specific information? Well, this is quite a task, right?
Searching for keywords is tiring and consumes alot of time, and in most cases, you can locate the exact information you are looking for. So, how can you get the precise information you want in a hundred-page document? Straightforward, create a Table of Contents (TOC)
Readers love a good table of contents, and I will show you how to create one. A table of contents helps readers navigate the entire document to look for a specific topic of interest.
What is a TOC?
It is a structure that allows the reader to overview the contents of a document and makes it easier for them to go to a specific section of the document. In short, a table of contents can show the difference between an average document and an excellent document.
Creating a table of contents in Microsoft Word doesn't require any shortcuts- you will get unpleasant results. The worst thing you can do when generating a TOC is copy and pasting or retyping the section headings into a makeshift table of contents. You will get errors that cannot be rectified unless you use wasteful manual efforts.
Then, how can you create the table of contents in the right way? Before I guide you step-by-step, allow me to explain why you need to use the table of contents in nearly all the documents you create using MS Word.
6 Advantages of Using Table of Contents.
A table of contents can occupy a whole page or just a few lines at the top of the document. A well-planned TOC helps authors and readers in different ways, as follows:
- Arrange your thoughts- A TOC helps you organize and outline your material and ideas when creating or editing a document. This ensures that you don't forget any vital part of your content.
- Make a good impression- A word document with a table of contents looks for professional than the one without. As I had stated, a TOC distinguishes between a typical document and an excellent one.
- Clear road map- Readers need a point of reference to locate specific information in your document quickly. The TOC's pages numbers help readers to thumb through a hard copy document. Readers can use web-style navigation in a soft copy by clicking on the links, which I will show later in this article.
- Complement the training outline- Trainers who create how-to manuals or any other documents used in technical training institutes can use training outlines as the entries in the TOC. A table of contents acts like a cheat sheet or executive summary for the contents in your document.
- Make it easier to discuss a document- It's not once you have attended a meeting or class, and you are given a copy without a table of contents or page numbers. This can be very hard to discuss and might take alot of time to locate specific sections. Including a table of contents in such a document makes it easy for people to have a seamless discussion.
- Meet readers' expectations- You can use a table of contents to set a framework and tone for your documents. It gives readers an excellent view of the contents of the document.
How to Create a Table of Content in Microsoft Word.
By default, MS Word generates a TOC using three heading styles: heading 1, heading 2, and Heading 3. To choose a style, go to Home Tab and select among the three heading styles.
You can manage heading styles in two different ways. You can either add them as you go or apply the heading styles to each section once you are done creating the document.
After you have selected the heading style you want, it is time to add the table of contents. Place the cursor at the point where you want your table of contents to be located. Then go to the References tab and click on the Table of Contents.
You will see a drop-down menu. You can choose any of the automatic table 1, automatic table 2, or manual table.
The difference between automatic table 1 and automatic table 2 is the title heading. Table one has 'Contents,' and table two has 'Table of Contents. If you select either automatic table 1 or 2, you will create the TOC using the names of the headings.
Looking keenly, you may have noticed there are sub-levels in both tables. They represent the heading styles that you selected for your document. If you set an automatic table of contents and have sub-levels, you will use heading 3 for level 3, heading 2 for level 2, and Heading 1 for level 1.
How do I create a multi level Table of Contents in Word?
If you want to add more levels to your Table of Contents, you can achieve that easily. Once you click on the table of contents, you will see a drop-down. Below the drop-down, you will see 'custom Table of Contents, click on that option and do a custom TOC.
Once the TOC window is open, click on the 'Options' and add the sub-level you want for your document. You will see headings that go up to number 6.
How do I make a table of contents clickable in Word?
Creating a table of contents is easy in word. It is also easy to make them clickable. Here is how you do it.
Make sure you have a blank page for inserting your table of content.
Highlight the heading of your 1st section, and this should be the same for section 2, etc.
At the home windows, under styles, click heading 1. Do this for all other heading sections. For subheadings, click section 2. Make it one subheading to make it easier.
After all, sections are highlighted with heading style, head back to the blank page.
Go to the references window in word.
Click on the table of content, and choose an automatic table 2 selection.
At this point, you'll be able to click on the individual table of content sections.
To view the navigation window, click on view and then on the navigation window pane. You can then select the items on that section to move via the document.
And there you have it. You have created a clickable table of contents.
Another Way to Create a Clickable Table of Contents
Go through each chapter's title and turn it into a heading style. The Quick Styles Gallery can use Microsoft Word techniques. You can find it in the home toolbar.
You can use the style you love or choose to make a custom one. You can achieve this by writing a list of chapters. After this, you can insert the table of contents.
Alternatively, at the bottom of the references toolbar, click the table of contents key. Then hyperlink your table of contents. If you decide to insert the table automatically instead of listing the chapters, it will generally link to the branches.
Purpose of Clickable Table of Contents
It makes it easier to both navigate and create longer documents. It also makes vast lengthy records easily accessible.
You can create them using a heading or without. If you settle for using headings, first create them. As titles will appear in the document as your list of places, hence you can teleport.
Why is my Table of Contents not picking up headings?
If you apply a heading style to a paragraph, it should show in the TOC and navigation pane. Applying a heading style to a paragraph inside a table won't show in the navigation pane. Why does this have to happen?
Here, there are two scenarios. First is the inclusion of headings in the Table of contents, and the second is the inclusion of headings in the navigation pane.
Let us start with the first one- The inclusion of heading styles in the Table of Contents. Heading styles in the document and the TOC should automatically appear in the TOC if that TOC is created based on heading styles- and applied correctly.
The built-in heading styles in the MS words are linked styles. This means that they can be applied across all paragraphs or to a particular portion of the contents. The style is applied depending on what is selected when applying the style.
In simple terms, for example, if you select a phrase or word in the heading paragraph, then apply the style; it is only applied to the phrase or the word and not the entire paragraph. And if you select the whole paragraph as a heading, it will appear in the TOC.
The simplest way to apply a linked heading style to a paragraph is not to choose a phrase or word in the heading paragraph. Or, you can place the insertion point in your paragraph and then apply the heading style.
If the headings in the Table are not showing up in the Table of content, you may be dealing with a corrupted document. You can verify this issue by creating another copy, insert the TOC and headings in it. The new document should show the headings from the Table in your TOC.
Let's now go to the second scenario-including headings in the navigation pane. The headings in the navigation pane are in which the whole paragraph is formatted with style.
The difference between the navigation pane and the Table of contents is that the navigation pane doesn't include any headings in the text boxes or the tables. And that is a setback for Word users.
The only way to overcome this setback is by breaking the Table into two and put the headings in between both tables as a standard paragraph. It means more work to sync multiple tables, but it is the only way to go about this.
How do you hyperlink back to a Table of Contents?
Having a hyperlinked table of contents is among the requirements for submitting a dissertation or thesis. A reader can navigate straight to that page via hyperlinks—the same for clicking on any bit of your table of contents.
How to Hyperlink your Table of Contents.
First, open your document in Word. It might contain a URL. The user settings will automatically change a typed URL to a hyperlink. In case it doesn't automatically link, then turn on the settings. You can do this by resorting to FILE then options to open the windows.
After this, snap-on proofing. At the left-hand side, then to the autocorrect choices critical towards up.
Ascertain that the box for "Internet and network paths with hyperlinks" is certified. You'll find it in the Autoformat tab.
It will still be possible for you to create a hyperlink even if you turn off auto-formatting. Just do it manually. First, type into your document the URL. Then with your cursor, highlight it.
After this, select a hyperlink flyout menu by right-clicking the highlighted text.
After doing this, a box will pop up
You'll be able to spot "text to display" at the top, and down, you'll see "address." Click the OK key to have the URL text in the form.
Alternatively, you can replace the "Text to display" with another word. For instance, let's have it replaced by "Microsoft." After clicking OK, the URL will be replaced by "Microsoft" and hyperlinked to the same address.
You can also, for instance, type "Microsoft" in the document, highlight, right-click, select hyperlink at the menu and lastly, type in the address in the "address" box. The outcome will still be the same.
You can also make use of the hyperlink menu to connect to other forms as well. For instance, you may want to connect some parts to the central part of your form. You are making it easier for a reader to dive in with a single click.
We also use styles and formatting. There are some which are built inside the Word. The Word has to know that these are headings. It is done by highlighting both headings, then choosing a heading style from the Home tab.
Depending on how Word is arranged, get to the menu.
Then have your headings styled.
And you can also change how they appear, in terms of size, color, etc.
The catch here is to let Word know they are headings.
After this, highlight the text and have the hyperlinks box up. Click on the box "place in this document" at the left. You'll be able to see the headings listed. Choose the one you'd love and click OK.
You'll also find an option for "email address" to the left at the hyperlink box. To have a linked email address, type the address in the document.
After highlighting it, select "email address" to ascertain the "text to display" has what you want inside in the hyperlinks box. After this, you can bring in your email address and even add a subject line.
Importance of Hyperlinking in Microsoft Word
For thesis and dissertation writers; Producing a linked table of contents makes navigating documents easier for users. The table of content becomes easily updatable as you go through your content.
For some lengthy forms published online, like in PDF, a hyperlinked table is expected by readers. Without forgetting a working URL, connection to other documents, and email addresses.
Readers also anticipate a table of contents that are hyperlinked from self-publishers in the ebooks.
Conclusion
As seen in this article, the Table of Contents in Microsoft Word shows professionalism, organization, and smartness. It makes it easier for both the author and the reader to navigate the documents within minutes.
Creating and managing a table of content is straightforward, and the good thing is that you can choose the automatic one. Table of Content works for both hard and soft copies-only that in hard copies, there are no clickable links. Next time you create a document, show how excellent you are by inserting a table of contents.
If you love matters to do with documents, you can learn how to edit a PDF without Adobe.
