What to Do If Thunderbird Failed to Find the Settings for Your Email?
<p>Thunderbird may fail to find settings for your email address while you’re setting up your mail account. It occurs due to the error in your incoming mail server setting and outgoing mail server setting. However, there are a few steps to troubleshoo
Thunderbird may fail to find settings for your email address while you’re setting up your mail account. It occurs due to the error in your incoming mail server setting and outgoing mail server setting. However, there are a few steps to troubleshoot it such as a manual configuration of your account set up, manual configuration of your outgoing mail server, access to the advanced account configuration, etc. In this article, we will talk about these steps in detail so that you can avoid this error in Thunderbird in the future.
It’s crucial to follow a proper guideline for setting up email accounts in Thunderbird. This article will walk you through each step of manual account configuration, customize server settings, and other necessary steps to avoid facing this error. Keep on reading to discover more.
What to Do If Thunderbird Failed to Find the Settings for Your Email?
In general, thunderbird is your email client. An email client isn’t an email provider so you will have to apply to an email service provider before you access Thunderbird. The ideal purpose of Thunderbird is to talk to one or even more servers and get your messages from them.
It’s basically a place where you can manage your multiple email accounts in one place. For instance, if you have accounts with Gmail, Yahoo, or Hotmail, then you can set up these accounts in your email client and manage all of these emails in one place instead of juggling them in between. You can drag and drop emails between different accounts, manage files, copy and paste emails from one account to another.
However, there are times when users may face errors while creating an account. It requires a guided process to follow in order to avoid these errors. This article will help you navigate through the account creation process in Thunderbird while bypassing the error where Thunderbird fails to detect the setting for your email.
How To Set Up An Email Account In Thunderbird?
The steps to set up an email account using Thunderbird are as follows,
- Open your Thunderbird and the mail account setup dialog box will open up promptly when you open your Thunderbird for the first time.
In case it doesn’t open up, you can visit the tools menu>account setting. Under the account setting page, click the account actions>add mail account.
From the mail account setup page, you have to do the following,
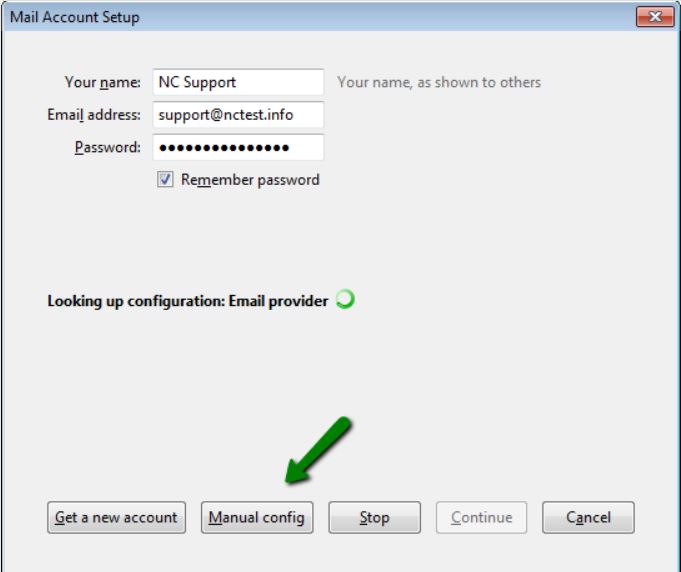
- Enter your name in the “your name” box that will appear on the “from” line in the outgoing emails.
- Enter your mail address in the “email address” box.
- Now, enter your password in the “password” box. In case you’re using Windows 10, then click “continue” or if you’re using Mac, then click “next”.
Once you click on continue or next, Thunderbird will start its process of finding the email setting that you need for configuring the account.
Still, you have to follow these guided processes mentioned below to avoid facing any errors while Thunderbird continues to find its email setting.
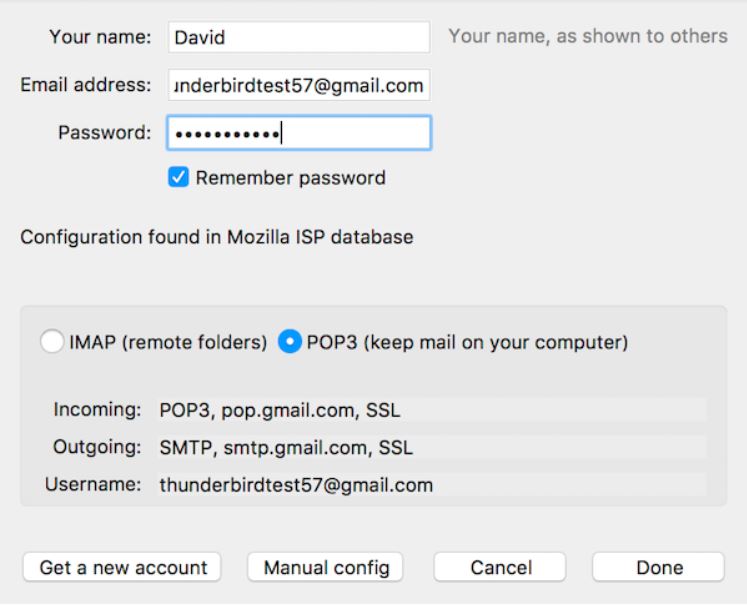
- Click “Stop” or you can wait for Thunderbird to find your account settings. Once the setting is found by thunderbird, make sure that the configuration is properly detected. It should match with the image below,
If the configuration is detected properly, then click on “create new account” to proceed further. Further, a page will open up that will let you change or view the Thunderbird setting. In case Thunderbird fails to detect the account setting, then there are processes to follow which we will discuss later in this article.
Moreover, the IMAP checkbox for the incoming server is automatically selected by Thunderbird. And, the server hostname for outgoing should be your SMTP server name. However, you can change these settings from the advanced setting option.
If you’re connected to Microsoft 365 email, then the POP or IMAP server should be partner.outlook.cn, and the outgoing server name or SMTP server name should be SMTP.office365.cn. In case, you’re not using Microsoft 365, then find your IMAP server setting or POP3 server setting by following the next steps.
Steps to Find IMAP or POP Server Setting
If you’re connected to Microsoft 365, then there’s no need to check your setting. The IMAP and POP server names will be automatically detected by Thunderbird. If you’re not, then consider following the steps mentioned below,
- Sign in to the account using the Outlook Web App.
- Now, click setting>options>account> visit my account> find setting for IMAP or POP access.
The IMAP4, POP3, and SMTP server names, and settings that you need to enter are listed on this IMAP or POP access page under each individual IMAP setting, POP setting, and SMTP setting.
Errors In Thunderbird & Possible Solutions
During the mail account setting, Thunderbird may fail to find the settings for your email account. Or you may see that the account setting found by Thunderbird doesn’t match.
Here are the possible solutions to follow in case Thunderbird fails to find the setting for your email account,
- Manual Account Configuration
In general, Thunderbird can configure most of the account setting steps automatically unless there’s an error when it fails to find settings for the account, and you are left with the manual configuration option.
There are a few other reasons that may lead you to manually configure your account. This includes,
- In case, the email service provider isn’t yet listed in the automatic configuration database of Thunderbird.
- In case, you are using a non-standard email configuration.
For manual configuration, you need to have a few details such as the incoming mail server name and the port, for instance, IMAP.abc.com and port 143. Also, you will need an outgoing mail server as well as a port, for instance, SMTP.abc.com with port 25. Lastly, you will need security setting to set up the connection with your server securely, for instance, the SSL, TLS, or STARTTLS.
To configure your account manually, you have to follow the steps mentioned below,
- Open the account setting by visiting the menu bar option and clicking on the “tools” section. Or you can even click on the Application menu>select option>visit account setting page from the sub-menu section.
Each email account that has been configured should already be listed on the left section of your Account Setting page. These accounts can also be displayed in the “all folders” list.
- Once you visit the account setting page, you will see the Account Actions button on the left section of the setting page. Now click on “add mail account”>add your mail account.
A page will open like this,
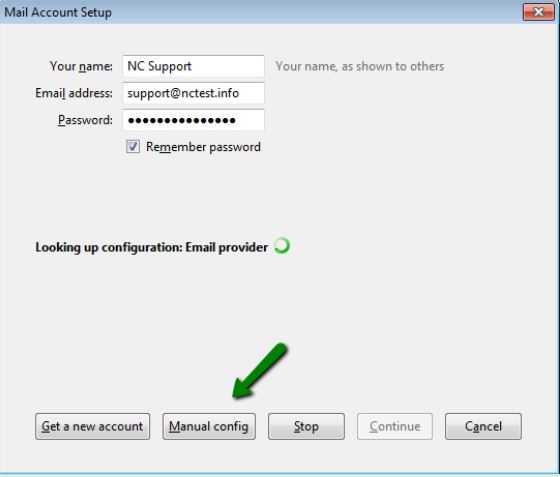
- Now submit your account details in the given boxes and click “Continue”. After this, Thunderbird will try to detect the account settings on your typed-in domain portion of the email address.
In case you tried these steps and Thunderbird says it fails to detect the account setting for this email, then click on the Manual configuration for further steps.
- Now you have to select either IMAP or POP3 from the “Account Type” list and enter the details as follows,
For incoming IMAP and outgoing SMTP servers, the details should be as follows,
Protocol- IMAP, Port- 993, Authentication- normal password, SSL- SSL or TLS.
Protocol- SMTP, Port- 465, Authentication- normal password, SSL- SSL or TLS.
For incoming POP and outgoing SMTP servers, the details should be as follows,
Protocol- POP, Port- 995, Authentication- normal password, SSL- SSL/ TLS.
Protocol- SMTP, Port- 465, Authentication- normal password, SSL- SSSL/ TLS.
There’s also an alternate option in case it didn’t work after retesting.
For IMAP,
Protocol- IMAP, Port- 143, Authentication- normal password, SSL- STARTTLS or none.
Protocol- SMTP, Port- 25 or 587, Authentication- normal password, SSL- STARTTLS or none.
Also for POP,
Protocol- POP, Port- 110, Authentication- normal password, SSL- STARTTLS or none.
Protocol- SMTP, Port- 25 or 587, Authentication- normal password, SSL- STARTTLS or none.
Once you manually enter the details, click on the “re-test” to run a test for the manual setting that you entered. There should be an instant response for indicating the valid settings. In case, Thunderbird is unable to detect your account setting, then you have to enter the alternative details shown above and click the “re-test” again.
2. Changing IMAP Server to POP
If you’re having an IMAP server but you want to configure your new account for POP, then there are processes regarding the same.
Here are the steps to follow for changing the IMAP server to POP,
- Visit tools>account setting>click on account action> add mail account.
- Now type in the information regarding your email address, full name, password, and then click on Continue.
- Thunderbird automatically configures the account setting for both IMAP and POP3. So, select POP3 from this page and click Done.
- Now type the details regarding your incoming mail providers and outgoing mail providers and select the “POP3” from the drop-down list. This is crucial as you won’t be able to change to POP from IMAP in case you have selected IMAP from the drop-down list.
- Once you have selected these settings, click on the Re-test button. An instant message will pop up saying that the configuration has been found at the email service provider. In case it doesn’t pop up, check your setting and try again.
After setting everything up, you need to check that the incoming and outgoing mail both are working properly. Everything working correctly means that you can send as well as receive emails, check your old emails, etc.
Note: Some of the email providers don’t give access to all of the past emails or folders. You need to check with your individual account’s email provider to ensure you can get access to all your files.
In case, you have accidentally created the IMAP account, then you can easily delta the account by following this simple method.
Open tools>visit account setting>select IMAP account with the same IMAP server setting> select account actions> then select remove the account.
Configure Your Email Outgoing Server
You can use the same SMTP outgoing server for your multiple email accounts as these servers are always created from individual email accounts. To configure your SMTP outgoing server, you have to follow the steps mentioned below,
- Visit the Account Setting dialog box. From the left pane, choose your outgoing server SMTP by clicking on the bottom of that list.
Here’s an example of configuring a Gmail account with an SMTP server,
Server name- smtp.gmail.com port- 587 user name & password- status checked. Connection security- STARTTLS.
Once you save this information about your new outgoing SMTP server, you can select the new email account from the list. Other items on this page will automatically be created as you enter your account details.
3. Advanced Account Configuration
You can directly access the advanced account configuration after creating your email account with Thunderbird.
To access the advanced account configuration setting after creating your account, you need to follow the steps mentioned below,
- Right-click on the account from the list of accounts you have.
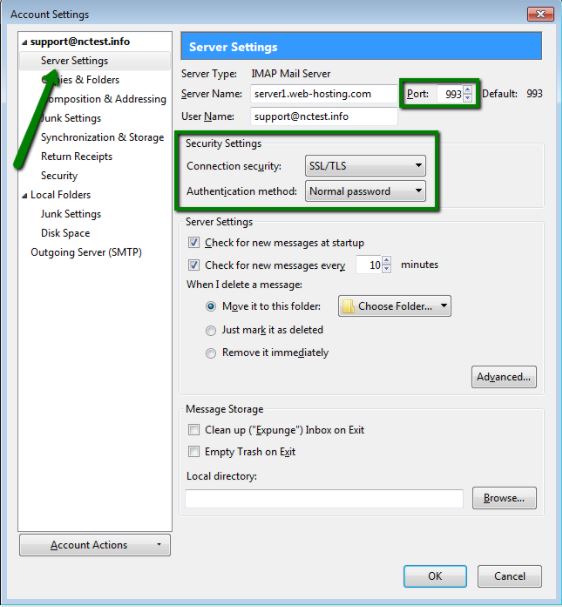
- Now select the server setting to manage your incoming server.
You can change the settings on this page.
- Also, you can select the outgoing server(SMTP) to change the outgoing server’s setting.
You can click and edit any setting and make some changes to it from this page.
Additional Information
There are a few more things you should be aware of while using Thunderbird and confronting errors especially when Thunderbird fails to detect the configuration for your email address.
Here’s the list of things that you need to know,
- Advanced IMAP Setting: You can visit the advanced setting option to configure your IMAP server setting. There are a few things you can customize such as the IMAP server directory, maximum server number’s connections to cache, or the subscribed folders. In case the IMAP folders are residing in different locations than the default, then you can correct its location. In case, the server contains other folders for different functions, then you can set up a different folder for the function.
- Advanced POP Setting: You can customize the advanced POP setting to configure your server setting. In the POP server setting, you can customize the process of placing a copy in, placing replies in folders of where the message is being replied to, Bcc the mail addresses, cc the mail addresses, keeping messages in archives, keeping draft messages, keeping messages templates in, etc.
- Outlook Web App: If your mail account is a specific type where it requires registration, then you have to register your mail by signing in to the outlook web app at first. Otherwise, if you try to connect your mail account through IMAP4 or POP3, it will fail. After signing in to the Outlook Web App, sign out from the page and then try to connect using the IMAP4 or POP3 program.
- Folder Synchronization: The folder synchronization option depends on the type of server you’re using for your incoming emails. If you are using the incoming POP3 server, then you can synchronize the inbox folder. However, if you’re using an IMAP4 incoming server, then you can choose any folder that you want. Thunderbird will synchronize any folder with this server. Still, IMAP4 doesn’t support the synchronization of calendar folders and contact folders.
Conclusion
Thunderbird is an open-source, free, and cross-platform application that allows you to manage your emails, chats, news feeds, and newsgroups under one shade. Rather than a browser or web-based application, it’s a local application that offers illimitable easy-to-use powerful features.
However, sometimes errors occur in Thunderbird. Especially, dealing with the error that says Thunderbird fails to detect the email setting is pretty common. You can use these above-mentioned methods to find a reliable solution and set your account up on Thunderbird.


